Weslo Wlevex2715 Instruction Manual - Page 7
Warning
 |
View all Weslo Wlevex2715 manuals
Add to My Manuals
Save this manual to your list of manuals |
Page 7 highlights
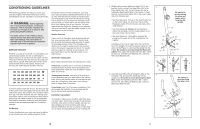
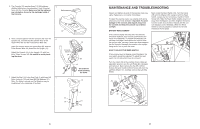
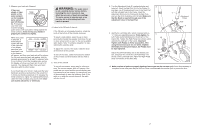
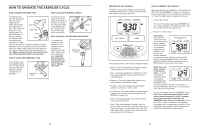
3. Measure your heart rate if desired. If there are sheets of clear plastic on the Metal Contacts metal contacts on the handgrip pulse sensor, peel off the plas- tic. To measure your heart rate, hold the handgrip pulse sensor, with your palms resting against the metal contacts. Avoid moving your hands or gripping the contacts too tightly. When your pulse is detected, a heart-shaped symbol will flash in the right side of the display each time your heart beats, one or two dashes will appear, and then your heart rate will be shown. For the most accurate heart rate reading, hold the handgrip pulse sensor for at least 15 seconds. Note: If you continue to hold the handgrip pulse sensor, the display will show your heart rate for up to 30 seconds. The display will then show your heart rate along with the other modes. If your heart rate is not shown, make sure that your hands are positioned as described. Be careful not to move your hands excessively or to squeeze the metal contacts too tightly. For optimal performance, clean the metal contacts using a soft cloth; never use alcohol, abrasives, or chemicals. WARNING: The pulse sensor is not a medical device. Various factors, including the user's movement, may affect the accuracy of heart rate readings. The pulse sensor is intended only as an exercise aid in determining heart rate trends in general. 4. Listen to the FM radio if desired. If the FM radio is not already turned on, rotate the knob at the bottom of the console clockwise. To select a radio station, press the up or down arrow button beside the speaker; hold down the up or down arrow button to scan for the next available radio station. Note: To enhance reception, try repositioning the exercise cycle. To adjust the volume of the radio, rotate the knob at the bottom of the console. To turn off the radio, rotate the knob at the bottom of the console counterclockwise until you hear a click. 5. Turn off the console. To turn off the console, simply wait for a few minutes. The console has an "auto-off" feature. If the pedals are not moved and the console buttons are not pressed for a few minutes, the console will turn off automatically to save the batteries. Note: If the radio is on when the console turns off, the radio will also turn off. 8. Turn the Adjustment Knob (9) counterclockwise and 8 remove it. Insert the Seat Post (5) into the Frame (1), and align one of the adjustment holes in the Seat Post with the indicated hole in the Frame. Insert the Adjustment Knob into the Frame and the Seat Post, and turn the Knob clockwise until it is tight. Make sure that the Knob is inserted through one of the adjustment holes in the Seat Post. 5 Adjustment Holes 1 Hole 9 9. Identify the Left Pedal (24), which is marked with an "L." Using an adjustable spanner, firmly tighten the 9 Left Pedal counterclockwise into the left arm of the 25 Crank (35). Tighten the Right Pedal (not shown) clock- wise into the right arm of the Crank. Important: Tighten both Pedals as firmly as possible. After 35 using the exercise cycle for one week, retighten the Pedals. For best performance, the Pedals must be kept tightened. 24 Adjust the Left Pedal Strap (25) to the desired posi- Tab tion, and press the end of the Left Pedal Strap onto the tab on the Left Pedal (24). Adjust the Right Pedal Strap (not shown) in the same way. 10. Make sure that all parts are properly tightened before you use the exercise cycle. Note: After assembly is completed, some extra parts may be left over. Place a mat beneath the exercise cycle to protect the floor. 10 7
-
 1
1 -
 2
2 -
 3
3 -
 4
4 -
 5
5 -
 6
6 -
 7
7 -
 8
8
 |
 |
