WestBend SR1000 Instruction Manual - Page 4
Assembling Your Smoothie Maker
 |
View all WestBend SR1000 manuals
Add to My Manuals
Save this manual to your list of manuals |
Page 4 highlights
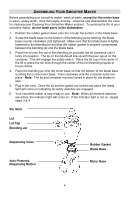
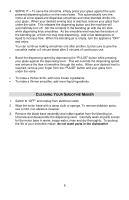
ASSEMBLING YOUR SMOOTHIE MAKER Before assembling your smoothie maker, wash all parts, except for the motor base in warm, soapy water, rinse thoroughly and dry. Unscrew and disassemble the valve for cleaning (see Cleaning Your Smoothie Maker section). To prolong the life of your smoothie maker, do not wash parts in the dishwasher. 1. Position the rubber gasket down onto the circular flat surface in the blade base. 2. Screw the blade base on the bottom of the blending jar by twisting the blade base counter-clockwise until tightened. Make sure that the blade base is tightly fastened to the blending jar and that the rubber gasket is properly compressed between the blending jar and the blade base. 3. Place the lid onto the top of the blending jar and twist the lid clockwise until it locks into position. The lip on the lid should line up with the pour spout on the container. This will engage the safety switch. Place the lid cap in the center of the lid or place the stir stick through the center of the lid if blending liquids or frozen drinks. 4. Place the blending jar onto the motor base so that the bottom of the blade base is sitting flat on the motor base. Twist clockwise until the container locks into place. Note: The lid and container must be locked in place for the blades to spin. 5. Plug in the cord. Once the lid and the goblet are locked into place the ready light will come on indicating all safety switches are engaged. 6. Your smoothie maker is now ready to use. Note: When all interlock switches are active, the indicator light will come on. If the indicator light is not on, repeat steps 3 & 4. Stir Stick Lid Lid Cap Blending Jar Dispensing Valve Auto-Powered Dispensing Button Rubber Gasket Blade Base Motor Base 4
-
 1
1 -
 2
2 -
 3
3 -
 4
4 -
 5
5 -
 6
6 -
 7
7 -
 8
8 -
 9
9 -
 10
10 -
11
-
12
-
13
-
14
-
15
-
16
-
17
-
18
-
19
-
20
-
21
-
22
-
23
-
24
-
25
-
26
-
27
-
28
-
29
-
30
-
31
-
32
-
33
-
34
-
35
-
36
 |
 |
