Western Digital My Book Office Edition User Manual - Page 7
Connecting the Device
 |
View all Western Digital My Book Office Edition manuals
Add to My Manuals
Save this manual to your list of manuals |
Page 7 highlights
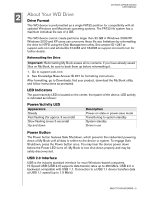
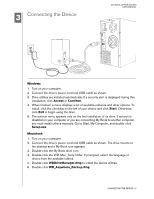
3 Connecting the Device MY BOOK OFFICE EDITION USER MANUAL Windows 1. Turn on your computer. 2. Connect the drive's power cord and USB cable as shown. 3. Drive utilities are installed automatically. If a security alert is displayed during this installation, click Accept or Continue. 4. When finished, a menu displays a list of available software and other options. To install, click the checkbox to the left of your choice and click Start. Otherwise, click Exit to begin using the drive. 5. The autorun menu appears only on the first installation of its drive. If autorun is disabled on your computer or you are connecting My Book to another computer, you must install utilities manually. Go to Start, My Computer, and double-click Setup.exe. Macintosh 1. Turn on your computer. 2. Connect the drive's power cord and USB cable as shown. The drive mounts to the desktop and a My Book icon appears. 3. Double-click the My Book drive icon. 4. Double-click the WD_Mac_Tools folder. If prompted, select the language of choice from the available folders. 5. Double-click WDDriveManager.dmg to install the device utilities. 6. Double-click WD_Anywhere_Backup.dmg. CONNECTING THE DEVICE - 5
-
 1
1 -
 2
2 -
 3
3 -
 4
4 -
 5
5 -
 6
6 -
 7
7 -
 8
8 -
 9
9 -
 10
10 -
 11
11
 |
 |
