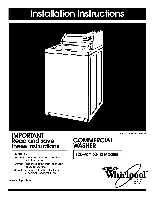
Whirlpool CAM2752TQ Installation Instructions - Page 4
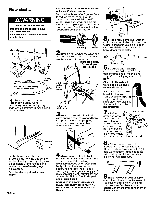
Donotforceexcesslengthof, Drainhosedown Thestandpipe., Thiscouldcausesiphoning.see - washer
 |
UPC - 883049046303
View all Whirlpool CAM2752TQ manuals
Add to My Manuals
Save this manual to your list of manuals |
Page 4 highlights
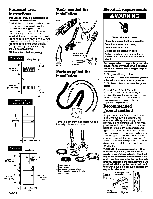
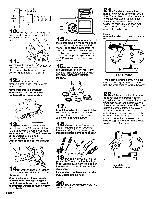
Now start... Excessive Weight Hazard Use two or more people to move and install washer. Failure to do so can result in back or other injury. shipping lm Rsheimppoinveg tsatrpaep, thPautll tcoovers completely remove the shipping strap with 2 colfferpins from the inside of the washer, Usa now hoses and washers that came with your Whirlpool washer. Replace inlet hoses after 5 years of use to reduce the risk of hose failure, Inspect and replace inlet hoses if \ bulges, kinks, cuts, wear, or leaks are found, When replacing your inlet hoses, mark the date of replacement on the label with a permanent marker, coupling washer m Insert a flat washer into each end of the inlet hoses, Check that washers are firmly seated in couplings, Inlets are plastic. Do Not stdp or crossthroad. cold water ivnalievte hot water inlet valve mPlace ho_e clamp over washer drain connector, Push drain hose onto washer connector, Use pliers to open clamp and slide clamp over drain hose, Check for good fit, dmL _[_D• Measure and mark a point approximately 16 inches (40,6 cm) from the plug end of the shipping strap, Cut this shipping strap at this point, Chock that hoso is not twisted or kinked and is socuroly in placo. Put "hook" end of drain hose into standpipe, Tightly wrap the shipping strap around the standpipe, Push plug into the nearest hole in the shipping strap, | aAltach hose to boltom inlet 3valve opening first, Then second hose to top inlet, Tighten couplings by additional two-thirds turn, hand; then use pliers to make an alffaching water w7inal•etegt r hootshrereosu, grhun = a bucket, This will get rid of particles binotwhatefarucleintses itnhtaot _'iit Mark which is the hot water faucet, Pull firmly to remove the end of shipping strap from the back of the washer, The shipping strap plug must be completely removed from the washer for the self-leveling legs to be released, Save tho shipping strap for uso in Step 6. PAGE 4 B Move washer close to final position, Put "hook" end of drain hose into standpipe, Estimate length of drain hose needed when washer is in final position, Hose must be cut exactly to length so "hook" end is held tightly over edge of standpipe, If drain hose is too long, cut straight end of hose, (Do Not cut "hook" shaped and of drain hose.) DO NOT FORCEEXCESSLENGTHOF DRAINHOSEDOWN THESTANDPIPE. THISCOULD CAUSESIPHONING. See Step 6. _;mAltach bolffom hose (inlet might clog hoses, Amltaarckhed to"pH') hotoseho(itnlewtatemrarkfaeudcet,"C') to cold water faucet, Tighten coupling to faucet by hand; then use pliers to make final two-thirds turn, dllk _ mStack two corner posts on top of each other, Tilt washer backwards and insert corner posts 3 inches (7,6 cm) in from one side of washer as shown, Repeat with other corner posts on other side of washer,
-
 1
1 -
 2
2 -
 3
3 -
 4
4 -
 5
5 -
 6
6 -
 7
7 -
 8
8 -
 9
9 -
 10
10 -
11
-
12
-
13
-
14
-
15
-
16
 |
 |
