Whirlpool EL87TRRRV Use and Care Manual - Page 9
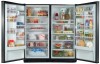
Refrigerator, Features - refrigerators
 |
UPC - 058822011629
View all Whirlpool EL87TRRRV manuals
Add to My Manuals
Save this manual to your list of manuals |
Page 9 highlights
Adjusting the Control Give the refrigerator time to cool down completely before adding food. It is best to wait 24 hours before putting food into the refrigerator. The control is set correctly when milk or juice is as cold as you like. Move the dial one setting at a time and wait 24 hours between adjustments. IMPORTANT: If you add food before the refrigerator has cooled completely, your food may spoil. Turning the Temperature Control to a colder (higher) than recommended setting will not cool the compartment any faster. NOTE: During high humidity, moisture may form on the outside of the refrigerator. To prevent rust, dry the refrigerator's exterior and reset the Temperature Control to a colder (higher) setting. Crisper Cover To remove the crisper(s) cover: 1. Remove crisper(s). Hold the glass insert firmly with one hand and press up in the center of the glass insert until it rises above the plastic frame. Carefully slide the glass insert forward to remove. 2. Lift the cover frame and remove it. REFRIGERATOFREATURES _mportant information to know about glass ehe_ves and covers: Do not clean glass shelves or covers with warm water when they are cold= Shelves and covers may break if exposed to sudden temperature changes or impact, such as bumping= For your protection, tempered glass is designed to shatter into many small, pebble-size pieces. This is normal= Glass shelves and covers are heavy= Use special care when removing them to avoid impact from dropping= Store similar foods together and adjust the shelves to fit different heights. This reduces the time the refrigerator door is open and saves energy. To remove and replace a shelf: 1. Remove the shelf by pulling it forward slightly to align the shelf stops with the openings in the refrigerator compartment liner. Lift straight up, and pull the shelf out the rest of the way. To replace crisper cover: 1. Fit the back of the cover frame into the supports on the side walls of the refrigerator. Lower the front of the cover frame into place. 2. Slide the rear of the glass insert into the cover frame and lower the front into place. Adjustable Meat Drawer (on some models} The meat drawer can be placed on either the right or left side of the refrigerator. To move the meat drawer: 1. Remove the meat drawer and cover. See "Refrigerator Shelves" section. NOTE: The meat drawer cover has one fixed support that runs down the center of the shelf. The outside support is the adjustable one. 2. Using a Phillips screwdriver, remove the adjustable support and move it to the other side of the meat drawer cover. 2. Replace the shelf by lowering the shelf stops through the openings in the refrigerator compartment liner. Slide the shelf in the rest of the way. Drawers To remove and replace a drawer: 1. Slide drawer straight out to the stop. Lift the front of the drawer and slide it out the rest of the way. 2. Replace a drawer by sliding it back in fully past the stop. 3. Place the meat drawer cover in the desired location and slide the meat drawer back into position. Meat Storage Guide Store most meat in original wrapping as long as it is airtight and moisture-proof. Rewrap if necessary. See the following chart for storage times. When storing meat longer than the times given, freeze the meat. Fresh fish or shellfish use same day as purchased Chicken, ground beef, variety meats (liver 1-2 days Cold cuts, steaks/roasts 3-5 days Cured meats 7-10 days Leftovers - Cover leftovers with plastic wrap, aluminum foil, or place in containers with tight fitting lids. You can adjust the amount of humidity in the moisture-sealed crisper using the settings between HIGH and LOW. LOW (open) lets moist air out of the crisper for best storage of fruits and vegetables with skins.
-
 1
1 -
2
-
3
-
 4
4 -
 5
5 -
 6
6 -
 7
7 -
 8
8 -
 9
9 -
 10
10 -
 11
11 -
 12
12 -
 13
13 -
 14
14 -
15
-
16
-
17
-
18
-
19
-
20
-
21
-
22
-
23
-
24
-
25
-
26
-
27
-
28
 |
 |
