Whirlpool G9IXEFMWS Owners Manual - Page 9
Crisper Humidity Control, Ice Maker, Water Dispenser, Water Filtration System - manual
 |
UPC - 883049155418
View all Whirlpool G9IXEFMWS manuals
Add to My Manuals
Save this manual to your list of manuals |
Page 9 highlights
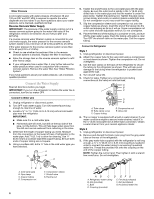
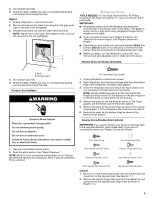
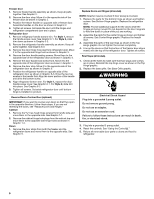
Crisper Humidity Control (on some models) You can control the amount of humidity in the moisture-sealed crisper. Adjust the control to any setting between LOW and HIGH. LOW (open) for best storage of fruits and vegetables with skins. HIGH (closed) for best storage of fresh, leafy vegetables. Ice Maker IMPORTANT: Flush the water system before turning on the ice maker. See "Water Dispenser." Allow 24 hours to produce the first batch of ice. Discard the first three batches of ice produced. Allow 3 days to completely fill the ice container. Turning the Ice Maker On/Off To turn the ice maker ON, simply lower the wire shutoff arm. To manually turn the ice maker OFF, lift the wire shutoff arm to the OFF (arm up) position and listen for the click. NOTE: Your ice maker has an automatic shutoff. As ice is made, the ice cubes will fill the ice storage bin and the ice cubes will raise the wire shutoff arm to the OFF (arm up) position. Do not force the wire shutoff arm up or down. Water Dispenser IMPORTANT: ■ After connecting the refrigerator to a water source or replacing the water filter, flush the water system. Use a sturdy container to depress and hold the water dispenser lever for 5 seconds, then release it for 5 seconds. Repeat until water begins to flow. Once water begins to flow, continue depressing and releasing the dispenser lever (5 seconds on, 5 seconds off) until a total of 3 gal. (12 L) has been dispensed. This will flush air from the filter and water dispensing system, and prepare the water filter for use. Additional flushing may be required in some households. As air is cleared from the system, water may spurt out of the dispenser. ■ Allow several hours for the refrigerator to cool down and chill water. ■ Dispense enough water every week to maintain a fresh supply. To Dispense Water: There are two water dispenser buttons for use with different sizes of containers. 1. Press a sturdy glass against the back button or hold a container under the dispenser while pressing the front button. 2. Remove the glass or release the front button to stop dispensing. Water Filtration System Ice Production Rate ■ Allow 24 hours to produce the first batch of ice. Discard the first three batches of ice produced. ■ The ice maker should produce approximately 8 to 12 batches of ice in a 24-hour period. ■ To increase ice production, lower the freezer and refrigerator temperature. See "Using the Control(s)." Wait 24 hours between adjustments. ■ For maximum ice production (on some models), push the switch to ICE PLUS. The ice maker should produce 16 to 20 batches of ice in a 24-hour period in the Ice Plus mode. Remember ■ The quality of your ice will be only as good as the quality of the water supplied to your ice maker. Avoid connecting the ice maker to a softened water supply. Water softener chemicals (such as salt) can damage parts of the ice maker and lead to poor quality ice. If a softened water supply cannot be avoided, make sure the water softener is operating properly and is well maintained. ■ Do not use anything sharp to break up the ice in the bin. This can cause damage to the ice container and the dispenser mechanism. ■ Do not store anything on top of or in the ice maker or ice bin. Do not use with water that is microbiologically unsafe or of unknown quality without adequate disinfection before or after the system. Systems certified for cyst reduction may be used on disinfected waters that may contain filterable cysts. Water Filter Status Light (on some models) The water filter status light will help you know when to change your water filter. The light will change from green to yellow. This tells you that it is almost time to change the filter. It is recommended that you replace the water filter when the status light changes to red. The disposable water filter should be replaced at least every 6 months OR earlier if the flow of water to your water dispenser or ice maker decreases noticeably. After changing the water filter, reset the water filter status light. The status light will change from red to green when the system is reset. Non-Indicator Water Filter (on some models) If your refrigerator does not have a water filter status light, you should change the disposable water filter at least every 6 months OR earlier if the flow of water to your water dispenser or ice maker decreases noticeably. 9
-
 1
1 -
2
-
3
-
 4
4 -
 5
5 -
 6
6 -
 7
7 -
 8
8 -
 9
9 -
 10
10 -
 11
11 -
 12
12 -
 13
13 -
 14
14 -
15
-
16
-
17
-
18
-
19
-
20
-
21
-
22
-
23
-
24
-
25
-
26
-
27
-
28
-
29
-
30
-
31
-
32
-
33
-
34
-
35
-
36
-
37
-
38
-
39
-
40
-
41
-
42
-
43
-
44
-
45
-
46
-
47
-
48
 |
 |
