Whirlpool GFG461LVS Installation Instructions - Page 14
Natural Gas Conversion - hood
 |
UPC - 883049139340
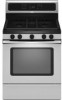
View all Whirlpool GFG461LVS manuals
Add to My Manuals
Save this manual to your list of manuals |
Page 14 highlights
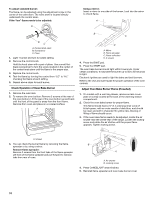
Refer to the following chart for correct LP gas orifice spud placement. LP Gas Orifice Spud Chart for Surface Burners Burner Rating Color Size ID Number 14,000 BTU 11,000 BTU 8,000 BTU 5,000 BTU Yellow/Orange Yellow/Brown Yellow/Black Yellow/White 1.07 mm 0.99 mm 0.85 mm 0.70 mm L107 L99 L85 L70 NOTE: Refer to the Model Number and Serial Number Plate located on the oven frame behind the top left side of the oven door for proper sizing of spuds for each burner location. 5. Place Natural gas orifice spuds in the cardboard orifice spud holder. 6. Replace the burner base using both screws. 7. Replace burner cap. 8. Repeat steps 1-7 for the remaining burners. To Convert Oven Bake Burner 1. Remove oven racks. 2. Use a ½" combination wrench to turn the orifice hood down snug onto pin (about 2 to 2½ turns). IMPORTANT: Do not overtighten. The oven bake burner flame cannot be properly adjusted if this conversion is not made. See "Adjust Oven Bake Burner Flame" in the "Electronic Ignition System" section. Complete Installation 1. Refer to the "Make Gas Connection" section for properly connecting the range to the gas supply. 2. Refer to the "Electronic Ignition System" section for proper burner ignition, operation, and burner flame adjustments. IMPORTANT: You may have to adjust the "LO" setting for each cooktop burner. Checking for proper cooktop, bake and broil burner flame is very important. The small inner cone should have a very distinct blue flame ¼" (0.64 cm) to ½" (1.3 cm) long. The outer cone is not as distinct as the inner cone. LP gas flames have a slightly yellow tip. 3. Refer to "Complete Installation" in the "Installation Instructions" section of this manual to complete this procedure. Natural Gas Conversion WARNING A B A A A. Orifice hood B. Pin To Convert Oven Broil Burner Use a ½" combination wrench to turn the orifice hood down snug onto the pin (about 2 to 2½ turns). IMPORTANT: Do not overtighten. The oven broil burner flame cannot be properly adjusted if this conversion is not made. See "Adjust Oven Broil Burner Flame" in the "Electronic Ignition System" section. Tip Over Hazard A child or adult can tip the range and be killed. Connect anti-tip bracket to rear range foot. Reconnect the anti-tip bracket, if the range is moved. Failure to follow these instructions can result in death or serious burns to children and adults. 1. Turn the manual shutoff valve to the closed position. B A C A. To range B. Manual shutoff valve "closed" position C. Gas supply line 2. Unplug range or disconnect power. A 14 B A. Lock screw B. Orifice hood
-
 1
1 -
2
-
3
-
4
-
5
-
6
-
7
-
8
-
 9
9 -
 10
10 -
 11
11 -
 12
12 -
 13
13 -
 14
14 -
 15
15 -
 16
16 -
 17
17 -
 18
18 -
 19
19 -
20
-
21
-
22
-
23
-
24
-
25
-
26
-
27
-
28
-
29
-
30
-
31
-
32
-
33
-
34
-
35
-
36
 |
 |
