Whirlpool GLS3064RS Installation Instructions - Page 6
Install Cooktop, Make Gas Connection - cutout
 |
UPC - 883049003566
View all Whirlpool GLS3064RS manuals
Add to My Manuals
Save this manual to your list of manuals |
Page 6 highlights
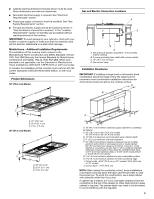
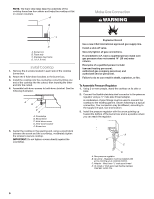
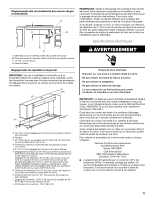
NOTE: The foam strip helps keep the underside of the cooktop frame free from debris and helps the cooktop sit flat on uneven counters. A B Make Gas Connection WARNING C D A. Burner box B. Foam strip C. Stainless steel frame D 1.6 mm) Install Cooktop 1. Remove the 2 screws located in each side of the cooktop burner box. 2. Attach the 2 hold-down brackets to the burner box. 3. Install the cooktop into the countertop cutout by tilting one end of the cooktop into the cutout, then lowering the other end into the cutout. 4. Assemble hold-down screws to hold-down bracket. See the following illustration. A B C D E A. Countertop B. Wood block C. Hold-down screw D. Hold-down bracket E. Burner box 5. Center the cooktop in the opening and, using a wood block between the screw and the countertop, moderately tighten the screws to secure cooktop. IMPORTANT: Do not tighten screws directly against the countertop. Explosion Hazard Use a new CSA International approved gas supply line. Install a shut-off valve. Securely tighten all gas connections. If connected to LP, have a qualified person make sure gas pressure does not exceed 14" (36 cm) water column. Examples of a qualified person include: licensed heating personnel, authorized gas company personnel, and authorized service personnel. Failure to do so can result in death, explosion, or fire. To Assemble Pressure Regulator: 1. Using 2 or more people, stand the cooktop on its side or back. 2. Connect the flexible stainless steel connector to the pressure regulator using a ¹⁄₂" male pipe thread adapter. A combination of pipe fittings must be used to connect the cooktop to the existing gas line. Shown following is a typical connection. Your connection may be different, according to the supply line type, size and location. 3. Install the pressure regulator with the arrow pointing up toward the bottom of the burner box and in a position where you can reach the regulator. A B C D A. Gas pressure regulator B. Up arrow - Regulator must be installed with arrow pointing up at cooktop bottom. C. Adapter - Must have ¹⁄₂" male pipe thread D. UL listed or CSA approved flexible stainless steel gas supply line 6
-
 1
1 -
 2
2 -
 3
3 -
 4
4 -
 5
5 -
 6
6 -
 7
7 -
 8
8 -
 9
9 -
 10
10 -
 11
11 -
 12
12 -
13
-
14
-
15
-
16
 |
 |
