Whirlpool GMC275PRS Use and Care Manual - Page 10
and you may use Cook A Bit More with Warm Hold.
 |
View all Whirlpool GMC275PRS manuals
Add to My Manuals
Save this manual to your list of manuals |
Page 10 highlights
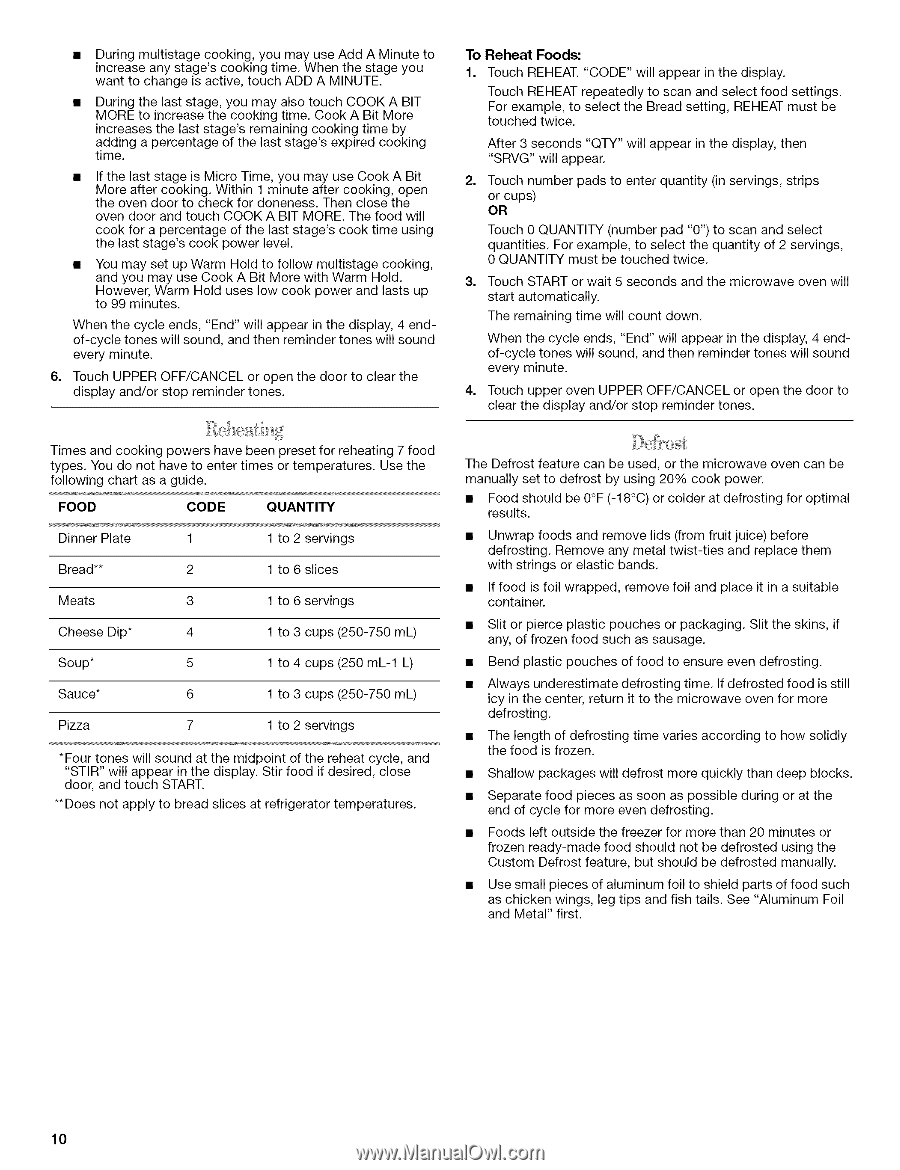
During multistage cooking, you may use Add A Minute to increase any stage's cooking time. When the stage you want to change is active, touch ADD A MINUTE. During the last stage, you may also touch COOK A BIT MORE to increase the cooking time. Cook A Bit More increases the last stage's remaining cooking time by adding a percentage of the last stage's expired cooking time. • If the last stage is Micro Time, you may use Cook A Bit More after cooking. Within 1 minute after cooking, open the oven door to check for doneness. Then close the oven door and touch COOK A BIT MORE. The food will cook for a percentage of the last stage's cook time using the last stage's cook power level. • You may set up Warm Hold to follow multistage cooking, and you may use Cook A Bit More with Warm Hold. However, Warm Hold uses low cook power and lasts up to 99 minutes. When the cycle ends, "End" will appear in the display, 4 endof-cycle tones will sound, and then reminder tones will sound every minute. 6. Touch UPPER OFF/CANCEL or open the door to clear the display and/or stop reminder tones. To Reheat Foods: 1. Touch REHEAT. "CODE" will appear in the display. Touch REHEAT repeatedly to scan and select food settings. For example, to select the Bread setting, REHEAT must be touched twice. After 3 seconds "QTY" will appear in the display, then "SRVG" will appear. Touch number pads to enter quantity (in servings, strips or cups) OR Touch 0 QUANTITY (number pad "0") to scan and select quantities. For example, to select the quantity of 2 servings, 0 QUANTITY must be touched twice. 3. Touch START or wait 5 seconds and the microwave oven will start automatically. The remaining time will count down. When the cycle ends, "End" will appear in the display, 4 endof-cycle tones will sound, and then reminder tones will sound every minute. 4. Touch upper oven UPPER OFF/CANCEL or open the door to clear the display and/or stop reminder tones. Times and cooking powers have been preset for reheating 7 food types. You do not have to enter times or temperatures. Use the following chart as a guide. FOOD CODE QUANTITY Dinner Plate 1 Bread** 2 1 to 2 servings 1 to 6 slices Meats 3 1 to 6 servings Cheese Dip* 4 1 to 3 cups (250-750 mL) Soup* 5 1 to 4 cups (250 mL-1 L) Sauce* 6 1 to 3 cups (250-750 mL) Pizza 7 1 to 2 servings *Four tones will sound at the midpoint of the reheat cycle, and "STIR" will appear in the display. Stir food if desired, close door, and touch START. **Does not apply to bread slices at refrigerator temperatures. The Defrost feature can be used, or the microwave oven can be manually set to defrost by using 20% cook power. • Food should be 0°F (-18°C) or colder at defrosting for optimal results. • Unwrap foods and remove lids (from fruit juice) before defrosting. Remove any metal twist-ties and replace them with strings or elastic bands. • If food is foil wrapped, remove foil and place it in a suitable container. • Slit or pierce plastic pouches or packaging. Slit the skins, if any, of frozen food such as sausage. • Bend plastic pouches of food to ensure even defrosting. • Always underestimate defrosting time. If defrosted food is still icy in the center, return it to the microwave oven for more defrosting. • The length of defrosting time varies according to how solidly the food is frozen. • Shallow packages will defrost more quickly than deep blocks. • Separate food pieces as soon as possible during or at the end of cycle for more even defrosting. • Foods left outside the freezer for more than 20 minutes or frozen ready-made food should not be defrosted using the Custom Defrost feature, but should be defrosted manually. • Use small pieces of aluminum foil to shield parts of food such as chicken wings, leg tips and fish tails. See "Aluminum Foil and Metal" first. 10
-
 1
1 -
2
-
3
-
4
-
 5
5 -
 6
6 -
 7
7 -
 8
8 -
 9
9 -
 10
10 -
 11
11 -
 12
12 -
 13
13 -
 14
14 -
 15
15 -
16
 |
 |