Whirlpool GR556LRKS Installation Instructions - Page 7
Tip Over Hazard, Connect anti-tip bracket to rear
 |
View all Whirlpool GR556LRKS manuals
Add to My Manuals
Save this manual to your list of manuals |
Page 7 highlights
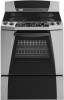
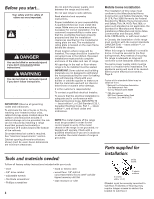
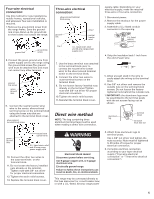
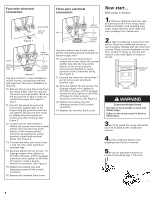
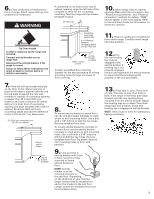
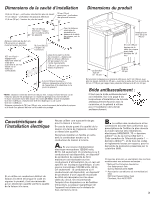
6. Place cardboard or hardboard in front of range. Stand range back up onto cardboard or hardboard. WARNING If countertop is not flush to the side of cabinet opening, align the left side of the template to allow for the countertop overhang. Tape the range anti-tip bracket template in place. A 25" (63.5 cm) 10. Move range close to cabinet opening. Make electrical connection. See "Electrical requirements" and "Electrical connection" sections for details. "8888" should appear in the clock display. Refer to Use and Care Guide for information on electronic controls. Tip Over Hazard A child or adult can tip the range and be killed. Connect anti-tip bracket to rear range foot. Reconnect the anti-tip bracket, if the range is moved. Failure to follow these instructions can result in death or serious burns to children and adults. 7. Place the anti-tip bracket template on the floor in the cabinet opening so that the left edge is against cabinets and the top edge is against the rear wall, molding or cabinet. If countertop opening is deeper than 25 inches (63.5 cm), measure and mark a distance 25 inches (63.5 cm) in from front of countertop opening and align template with mark (or subtract 25 inches [63.5 cm] from countertop depth and add the difference to the 2-1/4-inch [5.7 cm] dimension). 25" (63.5 cm) countertop over 24" (61 cm) cabinet slide-in cutout shown anti-tip bracket template Countertop overhangs cabinet side. A = Difference between countertop depth and 25" (63.5 cm). slide-in cutout shown anti-tip bracket template Contact a qualified floor covering installer for the best procedure of drilling mounting holes through your type of floor covering. 8. To mount anti-tip bracket to wood floor, use the anti-tip bracket template to mark where to drill mounting holes. Use a drill with a 1/8" drill bit to drill the two holes. Remove template from floor. To mount anti-tip bracket to concrete or ceramic floor, use the anti-tip bracket template to mark where to drill mounting holes. Use a drill with a 3/16" masonry drill bit to drill the two holes. Remove template from floor. Tap plastic anchors into mounting holes in floor with hammer. 9. Line up holes in anti-tip bracket with holes in floor. Use the screws provided to fasten anti-tip bracket to floor. NOTE: Anti-tip bracket must be mounted securely to the sub floor. Depending on the thickness of your flooring, longer screws may be necessary to anchor the bracket to the sub floor. Longer screws are available from your local hardware store. 11. Remove cardboard or hardboard from under range. Carefully move range into final position. 12.The left rear leveling leg must be engaged in the anti-tip bracket. If leveling leg is not properly engaged, remove and reposition the anti-tip bracket to ensure that the leveling leg fits properly in the anti-tip bracket. 13. Place rack in oven. Place level on rack, first side to side; then front to back. If the range is not level, pull range forward until the rear leveling leg is removed from the anti-tip bracket. Adjust the leveling legs up or down. Then slide range back into position. Check that leveling leg is engaged in anti-tip bracket. NOTE: Oven must be level for satisfactory baking conditions. 7
-
 1
1 -
 2
2 -
 3
3 -
 4
4 -
 5
5 -
 6
6 -
 7
7 -
 8
8 -
 9
9 -
 10
10 -
 11
11 -
 12
12 -
13
-
14
-
15
-
16
 |
 |