Whirlpool GW397LXUT Installation Instructions - Page 13
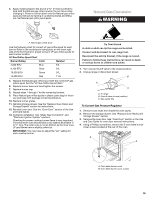
To Convert Oven Bake Burner
 |
UPC - 883049127804
View all Whirlpool GW397LXUT manuals
Add to My Manuals
Save this manual to your list of manuals |
Page 13 highlights
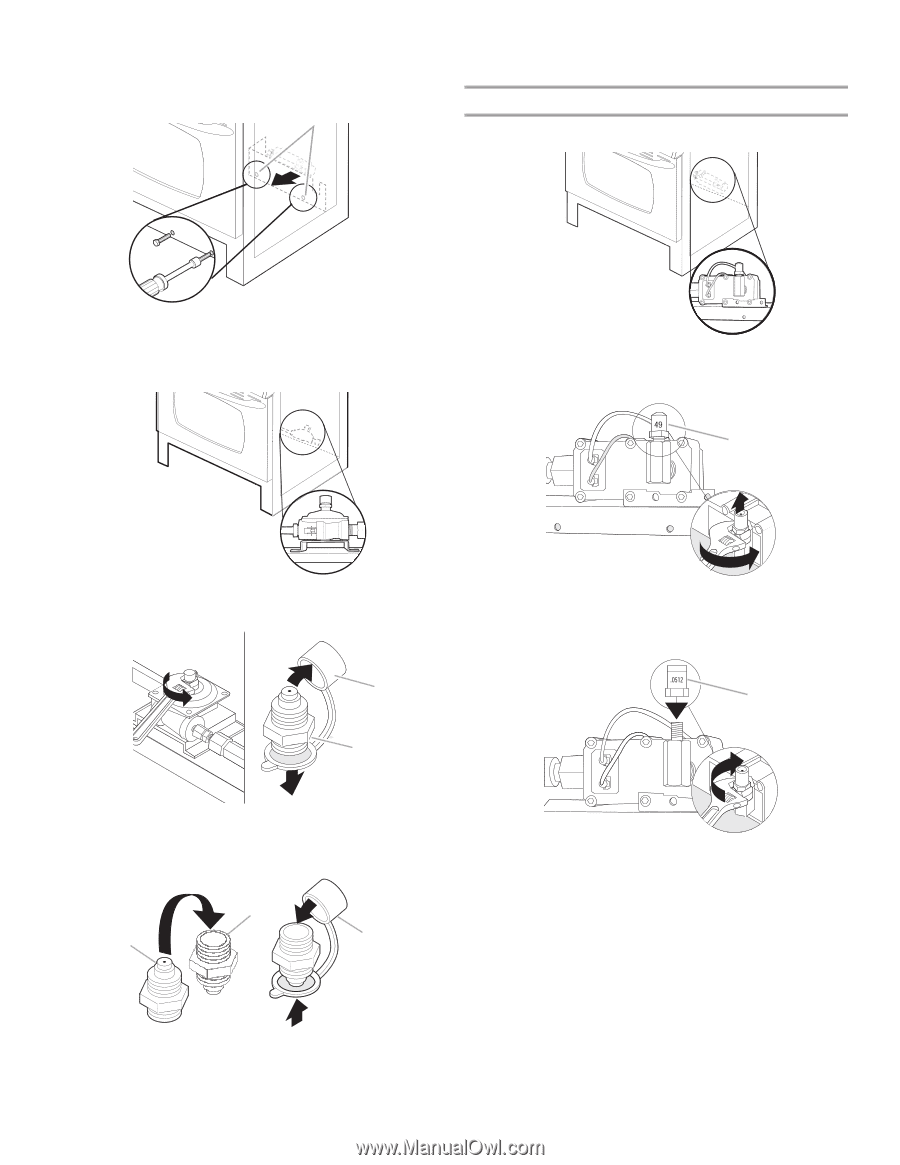
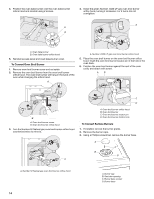
8. Locate the access panel at the rear of the storage drawer compartment. Using a ¼" (6 mm) nut driver, unscrew the 2 access panel screws. Remove access panel and set aside along with the 2 screws. A 12. Screw the regulator cap securely back into place. Do not overtighten. To Convert Oven Bake Burner 1. Locate the oven orifice hood from the front of the range. 2 A. Access panel screws 9. Locate gas pressure regulator at the rear of the storage drawer compartment. 2 2. Using an adjustable wrench, turn the Number 49 Natural gas oven bake burner orifice hood counterclockwise to remove. 49 A IMPORTANT: Do not remove the gas pressure regulator. 10. Unscrew the regulator cap and remove the plastic cover. A B A. Number 49 Natural gas oven bake burner orifice hood 3. Install the Number .0512 LP gas oven bake burner orifice hood, turning it clockwise 4 or 5 turns. Do not overtighten. .0512 A A. Plastic cover B. Regulator cap 11. Flip the regulator cap over and replace the plastic cover. B A C A. Black .0512 LP orifice hood A. Natural gas position B. LP gas position C. Plastic cover 13
-
 1
1 -
2
-
3
-
4
-
5
-
6
-
7
-
 8
8 -
 9
9 -
 10
10 -
 11
11 -
 12
12 -
 13
13 -
 14
14 -
 15
15 -
 16
16 -
 17
17 -
 18
18 -
19
-
20
-
21
-
22
-
23
-
24
-
25
-
26
-
27
-
28
-
29
-
30
-
31
-
32
-
33
-
34
-
35
-
36
 |
 |