Whirlpool KEBC208KSS Use and Care Guide - Page 6
ELECTRONIC OVEN CONTROL, Displays, Start, Lower Oven Cancel / Off
 |
View all Whirlpool KEBC208KSS manuals
Add to My Manuals
Save this manual to your list of manuals |
Page 6 highlights
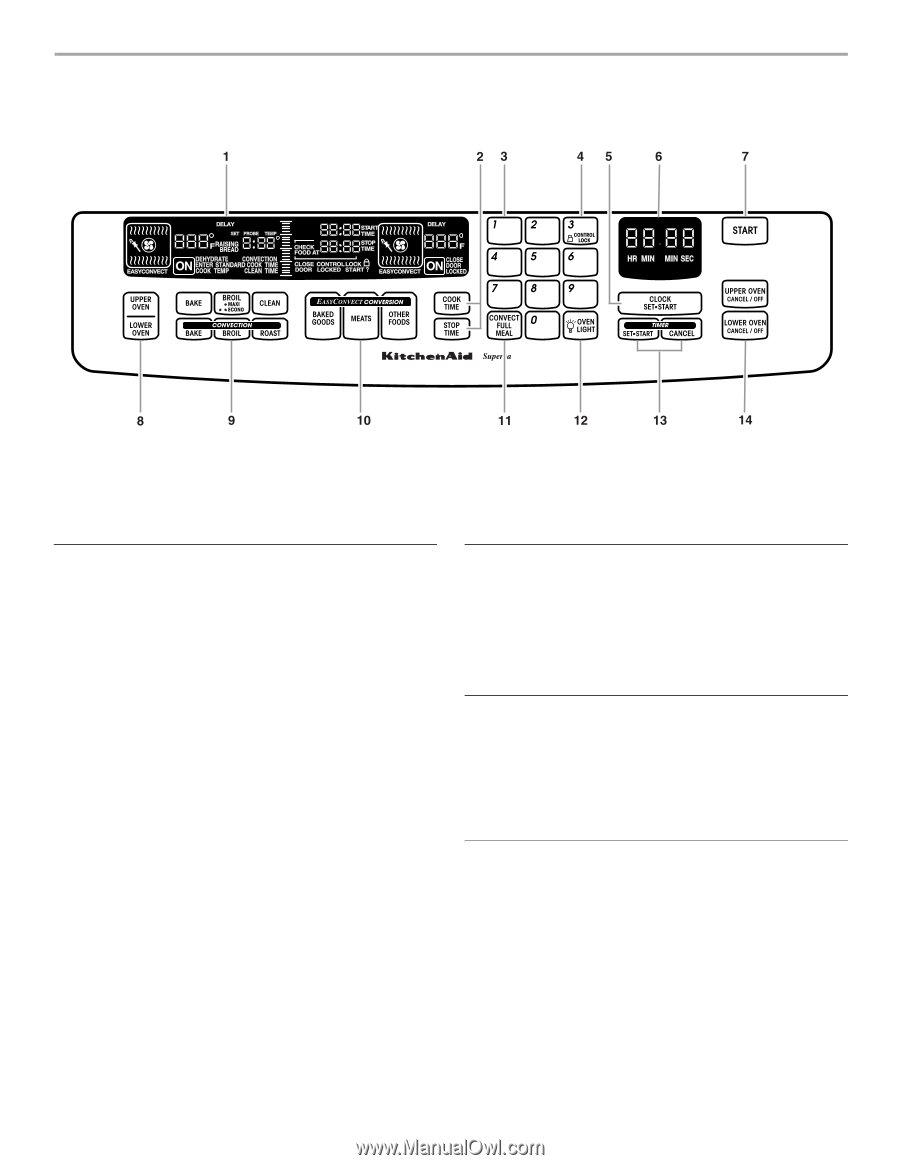
ELECTRONIC OVEN CONTROL This manual covers different models. The oven you have purchased may have some or all of the items listed. The locations and appearances of the items shown here may not match your model. 1. Oven Display 2. Timed Cooking 3. Number Pads 4. Control Lock 5. Clock 6. Time of Day, Timer Display 7. Start 8. Upper or Lower Oven Selectors (double oven models only) 9. Oven Option Selectors 10. EasyConvect™ Conversion 11. Convect Full Meal 12. Oven Light 13. Timer 14. Upper and Lower Oven Cancel / Off (double oven models) Cancel Off (single oven models) Displays When power is first supplied to the appliance, everything on the displays will light up for 5 seconds. Then, "PF" will appear on the oven display and a time of day will appear on the Time of Day display. Press LOWER OVEN CANCEL / OFF, UPPER OVEN CANCEL / OFF or CANCEL OFF to clear the oven display. Any other time "PF" appears, a power failure occurred. Press LOWER OVEN CANCEL / OFF, UPPER OVEN CANCEL / OFF or CANCEL OFF and reset the clock if needed. Oven Display When the oven(s) are in use, this display shows the oven temperature, heat source(s) and start time. On double oven models, this display will also show which oven is being set. The left cavity symbol represents the upper oven, and the right cavity symbol represents the lower oven. In addition, during Timed Cooking, this display shows a vertical bar and time countdown and the stop time (if entered). If "Err" appears on the oven display, an invalid pad was pressed. Press LOWER OVEN CANCEL / OFF, UPPER OVEN CANCEL / OFF or CANCEL OFF and retry your entry. When the ovens are not in use, this display is blank. Time of Day, Timer Display This display shows the time of day or Timer countdown. Start The START pad begins all oven functions except the Timer, Control Lock and Sabbath Mode. If not pressed within 5 seconds after pressing a pad, "START?" will appear on the oven display as a reminder. Depending on your model, if not pressed within 4 or 5 minutes after pressing a pad, the oven display will return to inactive mode (blank) and the programmed function will be canceled. Lower Oven Cancel / Off, Upper Oven Cancel / Off and Cancel Off The LOWER OVEN CANCEL / OFF, UPPER OVEN CANCEL / OFF and CANCEL OFF pads stop their respective oven functions except for the Clock, Timer, Control Lock and Sabbath Mode. The cooling fan may continue to operate even after an oven function has been canceled, depending on the oven temperature. Clock This is a 12-hour clock and does not show a.m. or p.m. To Set: Before setting, make sure the oven(s), Timer and Timed Cooking are off. On some models, the clock can be set when the oven(s) are on, however the start time will disappear. 1. Press CLOCK SET/START. 2. Press the number pads to set the time of day. 3. Press CLOCK SET/START or START. To Remove/Return Time of Day from Display: Press and hold CLOCK SET/START for 5 seconds. Repeat to re-display. The time should not have to be reset. 6
-
 1
1 -
 2
2 -
 3
3 -
 4
4 -
 5
5 -
 6
6 -
 7
7 -
 8
8 -
 9
9 -
 10
10 -
 11
11 -
 12
12 -
13
-
14
-
15
-
16
-
17
-
18
-
19
-
20
-
21
-
22
-
23
-
24
 |
 |