Whirlpool RF378LXPQ Installation Instructions - Page 5
Power supply cord method, Four-wire electrical connection, Three-wire electrical, connection - appliances
 |
View all Whirlpool RF378LXPQ manuals
Add to My Manuals
Save this manual to your list of manuals |
Page 5 highlights
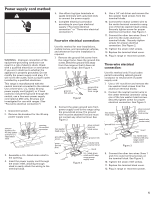
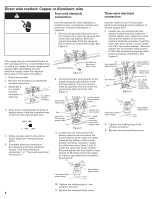
Power supply cord method: WARNING Electrical Shock Hazard Disconnect power before servicing. Use new 40 amp power supply cord. Plug into grounded outlet. Failure to follow these instructions can result in death, fire, or electrical shock. WARNING - Improper connection of the equipment-grounding conductor can result in a risk of electric shock. Check with a qualified electrician or serviceman if you are in doubt as to whether the appliance is properly grounded. Do not modify the power supply cord plug. If it will not fit the outlet, have a proper outlet installed by a qualified electrician. This range is manufactured with the neutral terminal connected to the cabinet. Use a three-wire, U.L.-listed, 40 amp power supply cord (pigtail); or if local codes Do not permit ground through the neutral, use a four-wire power supply cord rated at 250 volts, 40 amps and investigated for use with ranges. (See "Four-wire electrical connection.") 1. Disconnect power. 2. Remove the knockout for the 40 amp power supply cord. 5. Use either ring-type terminals or spade terminals with upturned ends to connect the power supply. 6. Complete electrical connection according to your type electrical supply ("Four-wire electrical connection" or "Three-wire electrical connection.") Four-wire electrical connection: Use this method for new installations, mobile homes, and recreational vehicles, and whenever four-wire installation is required. 7. Remove the ground-link screw from the range frame. Save the ground-link screw. Bend the ground-link away from the range so that it does not contact the range. See Figure 1. groundlink screw Figure1 ground-link bent away from range 8. Connect the green ground wire from power supply cord to the range using the ground-link screw. The ground wire must be attached first and must not contact any other terminal. See Figure 2. remove knockout for 40 amp power cord and U.L. listed strain relief opening for conduit connector 3. Assemble a U.L.-listed strain relief in the opening. 4. Insert the power supply cord through the strain relief, allowing enough slack to easily attach the wiring to the terminal block. hex washer head screw ground-link screw green ground wire line 1 silver-colored terminal block screw ground- link neutral wire (center wire) line 2 U.L. listed strain relief and 40 amp range power supply cord Figure 2 9. Use a 1/4" nut driver and remove the hex washer head screws from the terminal blocks. 10. Connect the neutral (center) wire to the center terminal connector using one of the hex washer head screws. Securely tighten screw for proper electrical connection. See Figure 2. 11. Connect the other two wires (lines 1 and 2) to the outer aluminum terminal blocks. Securely tighten screws for proper electrical connection. See Figure 2. 12. Tighten the strain relief screws. 13. Replace the terminal block cover. 14. Plug in range or reconnect power. Three-wire electrical connection: Use this method only if local codes permit connecting cabinet-ground conductor to neutral wire of power supply cord. 7. Use a 1/4" nut driver and remove the hex washer head screws from the aluminum terminal blocks. 8. Connect the neutral (center) wire to the center terminal connector using one of the hex washer head screws. Securely tighten screw for proper electrical connection. See Figure 3. hex washer head screw ground-link line 1 silver-colored terminal block screw neutral wire (center wire) line 2 U.L.-listed strain relief and 40 amp range power supply cord Figure 3 9. Connect the other two wires (lines 1 and 2) to outer terminal screws on the terminal block. See Figure 3. 10. Tighten the strain relief screws. 11. Replace the terminal block cover. 12. Plug in range or reconnect power. 5
-
 1
1 -
 2
2 -
 3
3 -
 4
4 -
 5
5 -
 6
6 -
 7
7 -
 8
8
 |
 |
