Whirlpool UDT555SAHP Installation Instructions - Page 16
Open and close door, Adjust door spring tension, Secure dishwasher, Sidemount attachement method,
 |
View all Whirlpool UDT555SAHP manuals
Add to My Manuals
Save this manual to your list of manuals |
Page 16 highlights
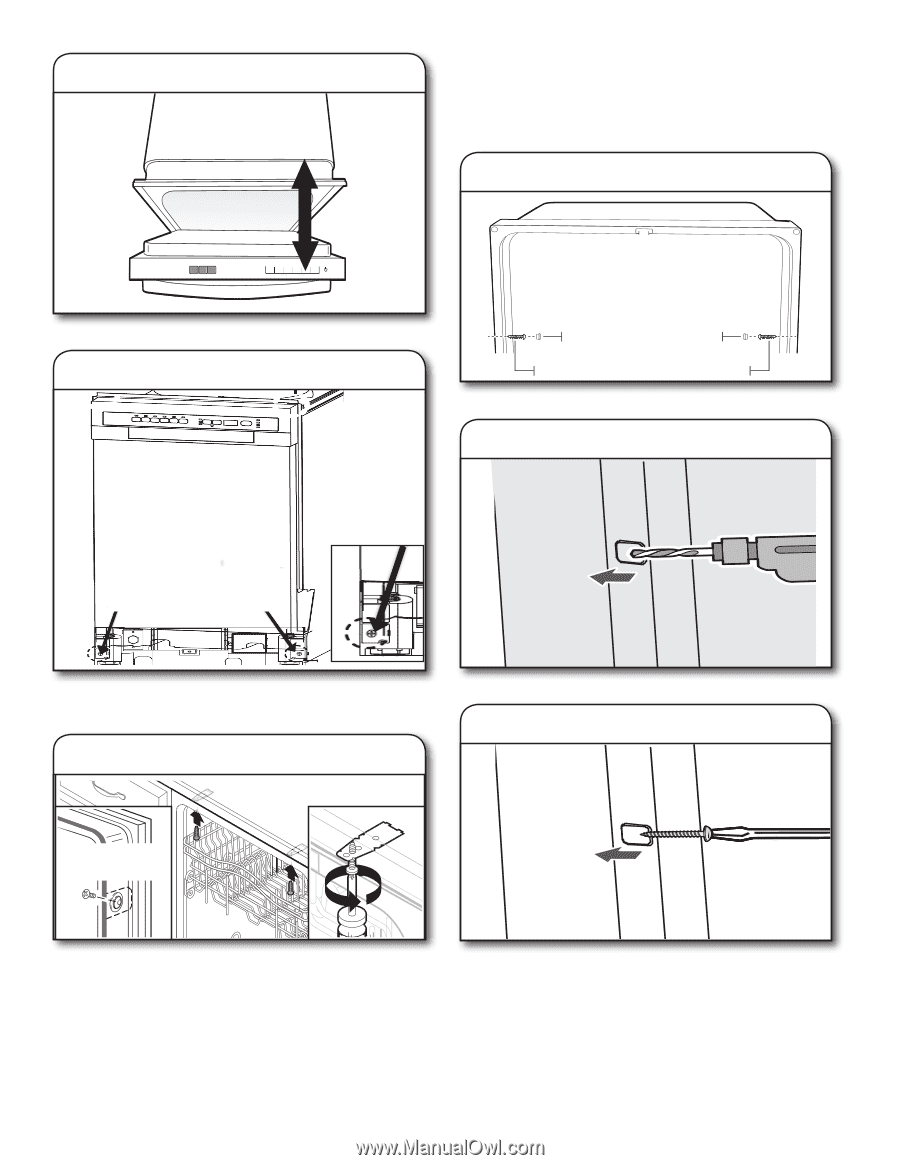
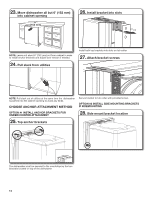
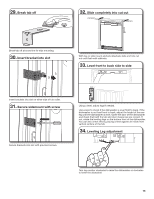
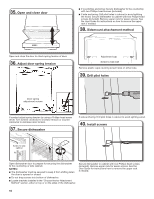
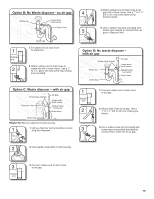
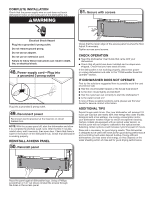
35. Open and close door ■■ If countertop anchoring: Secure dishwasher to the countertop with two Phillips-head screws (included). ■■ If side anchoring: Drill pilot holes in cabinet to avoid splitting the wood. Secure dishwasher to cabinet with two Philips-head screws (included). Remove upper rack for easier access. See the User Guide for instructions on how to remove the upper rack if needed. 38. Sidemount attachement method Open and close the door to check spring tension of door. 36. Adjust door spring tension AdAjudstjmuesntmcaep nt cap ScreSw ctoresidwe wtoall side wall Remove plastic caps covering screw holes on either side. 39. Drill pilot holes - - Door spring adjustment screws If needed adjust spring tension by using a Phillips-head screw driver. Turn screws clockwise to increase tension or counter clockwise to decrease door tension. 37. Secure dishwasher If side anchoring: Drill pilot holes in cabinet to avoid splitting wood. 40. Install screws Screw to side cabinet Open dishwasher door to prepare for securing the dishwasher to the countertop or side cabinet. NOTES: ■■ The dishwasher must be secured to keep it from shifting when the door is opened or closed. ■■ Do not drop screws into bottom of dishwasher. ■■ Locate brackets installed in the "Choose Anchor Attachment Method" section, either on top or on the sides of the dishwasher. Secure dishwasher to cabinet with two Phillips-head screws (included). Remove upper rack for easier access. See the User Guide for instructions how to remove the upper rack if needed. 16
-
 1
1 -
2
-
3
-
4
-
5
-
6
-
7
-
8
-
9
-
10
-
 11
11 -
 12
12 -
 13
13 -
 14
14 -
 15
15 -
 16
16 -
 17
17 -
 18
18 -
 19
19 -
 20
20 -
 21
21 -
22
-
23
-
24
-
25
-
26
-
27
-
28
-
29
-
30
-
31
-
32
-
33
-
34
-
35
-
36
-
37
-
38
-
39
-
40
-
41
-
42
-
43
-
44
-
45
-
46
-
47
-
48
-
49
-
50
-
51
-
52
-
53
-
54
-
55
-
56
-
57
-
58
-
59
-
60
 |
 |