Whirlpool UXD8636DY Owners Manual - Page 15
Important
 |
View all Whirlpool UXD8636DY manuals
Add to My Manuals
Save this manual to your list of manuals |
Page 15 highlights
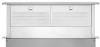
5. Install the left and right undercounter mounting brackets to the vent box. Slide the keyhole slots over the guide tabs and push the brackets up to set them in place. B A C 7. Check that the downdraft vent is level as shown below. Loosen the lower support leg screws and position the legs against the cabinet floor. B A D A. Vent box B. Undercounter mounting bracket B C. Keyhole slots D. Guide tabs 6. Drill 2 pilot holes through each of the undercounter mounting brackets into the underside of the countertop. Using 2 screws (not provided) of the appropriate length, mount the brackets to the countertop. IMPORTANT: Select a screw length that will not allow the screws to go through the countertop when tightened. A B C A A. Screws B. Backsplash C. Countertop A. Downdraft B. Level 8. Fasten the lower support legs to the cabinet floor with screws (not provided). A A. Screw (not provided) 9. Tighten the lower support leg screws. 10. Attach the left and right end caps to the vent box. Place the tab into the mounting slot at each end of the downdraft vent, as shown, and push down to lock into place. A B A. End cap tab B. Mounting slot 15
-
 1
1 -
2
-
3
-
4
-
5
-
6
-
7
-
8
-
9
-
 10
10 -
 11
11 -
 12
12 -
 13
13 -
 14
14 -
 15
15 -
 16
16 -
 17
17 -
 18
18 -
 19
19 -
 20
20 -
21
-
22
-
23
-
24
-
25
-
26
-
27
-
28
-
29
-
30
-
31
-
32
-
33
-
34
-
35
-
36
-
37
-
38
-
39
-
40
-
41
-
42
-
43
-
44
 |
 |
