Whirlpool UXT5230BD Installation Instructions - Page 11
SE119A
 |
View all Whirlpool UXT5230BD manuals
Add to My Manuals
Save this manual to your list of manuals |
Page 11 highlights
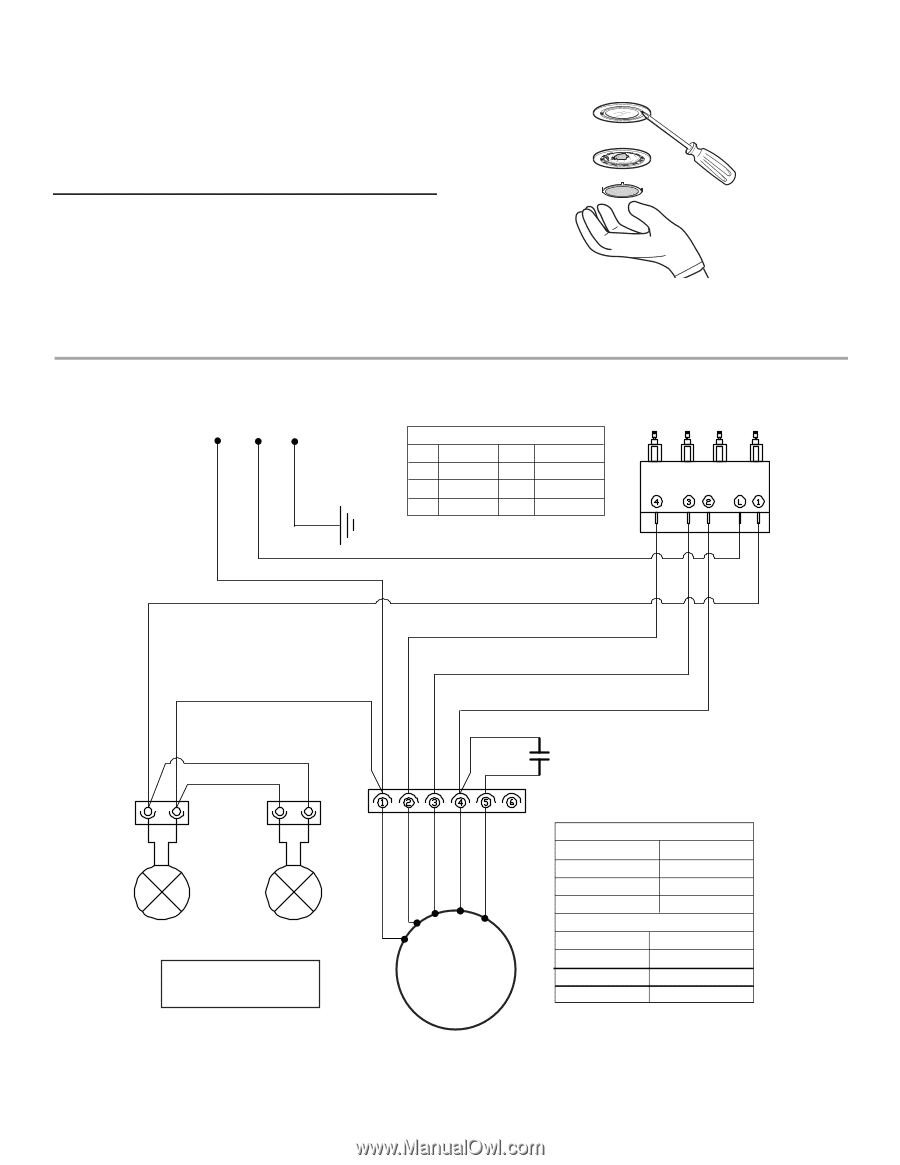
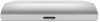
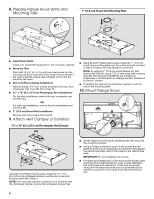
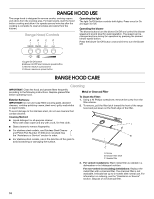
To Replace the Filter: 1. To reinstall the filter, place the back edge of the filter into the channel at the rear of the range hood. 2. Pull the filter latch toward the front of the range hood and push the front of the filter up into place. 3. Release the filter latch. It will spring back into place to secure the filter. 4. Replace the screw in the filter retainer. Replacing a Halogen Lamp Turn off the range hood and allow the halogen lamp to cool. To avoid damage or decreasing the life of the new lamp, do not touch the lamp with bare fingers. Replace the lamp, using tissue or wearing cotton gloves to handle the lamp. If new lights do not operate, make sure the lamps are inserted correctly before calling service. 1. Disconnect power. 2. Use a flat-blade screwdriver and gently pry the light cover loose. 3. Remove the lamp and replace it with a 120-volt, 40-watt maximum, halogen lamp made for a G-9 base. 4. Replace the light cover. 5. Reconnect power. WIRING DIAGRAM N L Gnd Ground Screw Switch Operation L-1 Lamps 120 V 1.5 Ohms L-2 Speed 1 120 V 1.5 Ohms L-3 Speed 2 120 V 2.0 Ohms L-4 Speed 3 120 V 2.5 Ohms Mechanical push buttons 4 buttons 3 speeds W (Common) BK (Line) BK (Line) W Y W Y (Lamp) GY (Speed 3) R (Speed 2) BR (Speed 1) BR 8uF Y Y Speed 1 Speed 2 Speed 3 Common SE119A R BK GY W M S15 BR Motor Characteristics Power Supply 120 VAC Frequency 60 Hz Amperage 0.9 ±10% A Wattage Rating 110 Watts Motor Resistance Red - Brown 27.5 ±10% Ohms Red - Black 55.7 ±10% Ohms Red - Gray 86.8 ±10% Ohms Red - White 117.7 ±10% Ohms 11
-
 1
1 -
2
-
3
-
4
-
5
-
 6
6 -
 7
7 -
 8
8 -
 9
9 -
 10
10 -
 11
11 -
 12
12 -
 13
13 -
 14
14 -
 15
15 -
 16
16 -
17
-
18
-
19
-
20
-
21
-
22
-
23
-
24
-
25
-
26
-
27
-
28
-
29
-
30
 |
 |