Whirlpool WDT730PAHZ Owners Manual - Page 11
Filtration System - parts
 |
View all Whirlpool WDT730PAHZ manuals
Add to My Manuals
Save this manual to your list of manuals |
Page 11 highlights
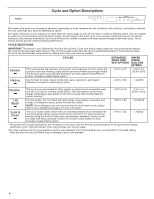
5. Replace the track stops by coming up from under the track and slipping the lower tab of the track stop into the lower slot of the track (see Track stop - right) and rotate the track stop into place. Then press on the edge of the ridged area while pushing the track stop straight toward the track. This action locks the retaining tab back into place. Track stop - right 6. Test the track stop by pulling it toward the opposite track to ensure that it is locked in place. To replace the rack: 1. Gently pull the tracks forward in the dishwasher until they stop. Remove track stops. See steps 1 through 3 above. 2. Place the back wheels on each side of the rack into the track and roll the rack into the tracks, but do not push the rack all the way into the tub. 3. Insert front rack wheels on each side of the rack into the track. 4. Slide the rack into the dishwasher. 5. Replace the track stops. See steps 5 and 6 above. IMPORTANT: Be sure that the track stops are locked in place and cannot be easily removed. They keep the rack from coming out of the track. Filtration System Your dishwasher has the latest technology in dishwasher filtration. This filtration system minimizes sound and optimizes water and energy conservation while providing superior cleaning. The filter system consists of two parts, an upper filter assembly and a lower filter. IMPORTANT: To avoid damage to dishwasher, do not operate your dishwasher without filters properly installed. Be sure lower filter is securely in place and upper filter assembly is locked into place. If upper assembly turns freely, it is not locked into place. The filters may need to be cleaned when: Upper filter assembly ■■ Visible objects or soils are on the upper filter assembly. ■■ Dishes feel gritty to the touch. Lower filter It is very easy to remove and maintain the filters. The chart below shows the recommended cleaning frequency. RECOMMENDED TIME INTERVAL TO CLEAN YOUR FILTERS Number of Loads Per Week If you only scrape before loading* If you scrape and rinse before loading If you wash before loading 8-12 Every 2 months Every 4 months Once per year 4-7 Every 4 months Once per year Once per year 1-3 Twice per year Once per year Once per year *We recommend this practice because it will conserve the water and energy that you would have used to prepare your dishes. This will also save you time and effort. Very Hard Water If you have hard water (above 15 grains), clean your filter at least once per month. Buildup of white residue on your dishwasher indicates hard water. For tips on removing spots and stains, see the "Troubleshooting" section. Filter Removal Instructions 1. Turn the upper filter assembly a quarter turn counterclockwise and lift out. Cleaning Instructions IMPORTANT: Do not use wire brushes, scouring pads, etc., as they may damage the filters. Rinse filter under running water until most soils are removed. If you have hard-to-remove soils or calcium deposits from hard water, a soft brush may be required. Locating tab L O CK PUSH DOWN & TURN UNL O CK To remove upper filter assembly 2. Separate the upper filter assembly by gently pulling apart. 3. Clean the filters as shown. 11
-
 1
1 -
2
-
3
-
4
-
5
-
 6
6 -
 7
7 -
 8
8 -
 9
9 -
 10
10 -
 11
11 -
 12
12 -
 13
13 -
 14
14 -
 15
15 -
 16
16 -
17
-
18
-
19
-
20
-
21
-
22
-
23
-
24
-
25
-
26
-
27
-
28
-
29
-
30
-
31
-
32
-
33
-
34
-
35
-
36
-
37
-
38
-
39
-
40
-
41
-
42
-
43
-
44
-
45
-
46
-
47
-
48
-
49
-
50
-
51
-
52
 |
 |
