Whirlpool WED4800XQ Installation Instructions - Page 15
Connect Vent, Level Dryer, Complete Installation Checklist - electric dryer
 |
UPC - 883049200057
View all Whirlpool WED4800XQ manuals
Add to My Manuals
Save this manual to your list of manuals |
Page 15 highlights
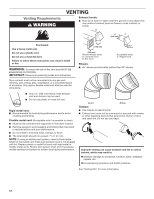
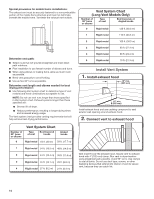
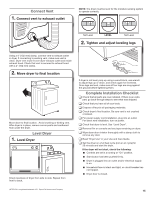
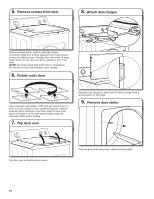
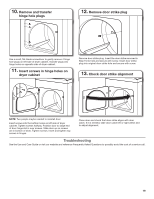
Connect Vent 1. Connect vent to exhaust outlet NOTE: The dryer must be level for the moisture sensing system to operate correctly. Not Level LEVEL Not Level 2. Tighten and adjust leveling legs Using a 4" (102 mm) clamp, connect vent to exhaust outlet in dryer. If connecting to existing vent, make sure vent is clean. Dryer vent must fit over dryer exhaust outlet and inside exhaust hood. Check that vent is secured to exhaust hood with a 4" (102 mm) clamp. 2. Move dryer to final location Move dryer to final location. Avoid crushing or kinking vent. After dryer is in place, remove corner posts and cardboard from under the dryer. Level Dryer 1. Level Dryer Check levelness of dryer from side to side. Repeat from front to back. If dryer is not level, prop up using a wood block, use wrench to adjust legs up or down, and check again for levelness. Once legs are level, make sure all four legs are snug against the ground before tightening them. Complete Installation Checklist q Check that all parts are now installed. If there is an extra part, go back through steps to see what was skipped. q Check that you have all of your tools. q Dispose of/recycle all packaging materials. q Check dryer's final location. Be sure vent is not crushed or kinked. q For power supply cord installation, plug into an outlet. For direct wire installation, turn on power. q Check that dryer is level. See "Level Dryer". q Remove film on console and any tape remaining on dryer. q Wipe dryer drum interior thoroughly with a damp cloth to remove any dust. q Read "Dryer Use" in your Use and Care Guide. q Set the dryer on a full heat cycle (not an air cycle) for 20 minutes and start the dryer. If the dryer will not start, check the following: ■■ Controls are set in a running or "On" position. ■■ Start button has been pushed firmly. ■■ Dryer is plugged into an outlet and/or electrical supply is on. ■■ Household fuse is intact and tight, or circuit breaker has not tripped. ■■ Dryer door is closed. †®TEFLON is a registered trademark of E.I. Dupont De Nemours and Company. 15
-
 1
1 -
2
-
3
-
4
-
5
-
6
-
7
-
8
-
9
-
 10
10 -
 11
11 -
 12
12 -
 13
13 -
 14
14 -
 15
15 -
 16
16 -
 17
17 -
 18
18 -
 19
19 -
 20
20
 |
 |
