Whirlpool WED49STBW Installation Guide - Page 7
Install Leveling Legs
 |
View all Whirlpool WED49STBW manuals
Add to My Manuals
Save this manual to your list of manuals |
Page 7 highlights
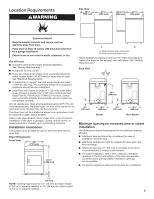
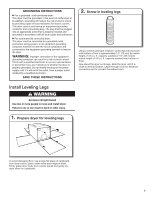
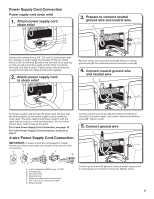
2. Screw in leveling legs Install Leveling Legs Using a wrench and tape measure, screw legs into leg holes until bottom of foot is approximately 1/2" (13 mm) (to match height of 3.6 cu. ft. capacity washer) or 1½" (38 mm) (to match height of 3.8 cu. ft. capacity washer) from bottom of dryer. Now stand the dryer on its legs. Slide the dryer until it is close to its final location. Leave enough room for electrical connection and to connect the exhaust vent. 1. Prepare dryer for leveling legs To avoid damaging floor, use a large flat piece of cardboard from dryer carton; place under entire back edge of dryer. Firmly grasp dryer body (not console panel) and gently lay dryer down on cardboard. 7
-
 1
1 -
 2
2 -
 3
3 -
 4
4 -
 5
5 -
 6
6 -
 7
7 -
 8
8 -
 9
9 -
 10
10 -
 11
11 -
 12
12 -
13
-
14
-
15
-
16
-
17
-
18
-
19
-
20
 |
 |

7
Prepare dryer for leveling legs
1.
To avoid damaging floor, use a large flat piece of cardboard
from dryer carton; place under entire back edge of dryer.
Firmly grasp dryer body (not console panel) and gently lay
dryer down on cardboard.
Screw in leveling legs
2.
Using a wrench and tape measure, screw legs into leg holes
until bottom of foot is approximately 1/2" (13 mm) (to match
height of 3.6 cu. ft. capacity washer) or 1½" (38 mm) (to
match height of 3.8 cu. ft. capacity washer) from bottom of
dryer.
Now stand the dryer on its legs. Slide the dryer until it is
close to its final location. Leave enough room for electrical
connection and to connect the exhaust vent.
Install Leveling Legs