Whirlpool WED6400SB Installation Instructions - Page 14
Reverse Door Swing
 |
UPC - 883049025094
View all Whirlpool WED6400SB manuals
Add to My Manuals
Save this manual to your list of manuals |
Page 14 highlights
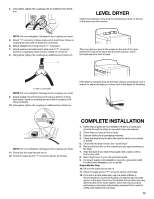
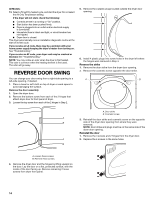
All Models: 13. Select a Timed Dry heated cycle, and start the dryer. Do not select the Air Only Temperature setting. If the dryer will not start, check the following: ■ Controls are set in a running or "On" position. ■ Start button has been pushed firmly. ■ Dryer is plugged into an outlet and/or electrical supply is connected. ■ Household fuse is intact and tight, or circuit breaker has not tripped. ■ Dryer door is closed. This dryer automatically runs an installation diagnostic routine at the start of its first cycle. If you receive an L2 code, there may be a problem with your home power supply keeping the dryer's heater from turning on. See "Troubleshooting." If you receive an AF code, your dryer vent may be crushed or blocked. See "Troubleshooting." NOTE: You may notice an odor when the dryer is first heated. This odor is common when the heating element is first used. The odor will go away. REVERSE DOOR SWING You can change your door swing from a right-side opening to a left-side opening, if desired. 1. Place a towel or soft cloth on top of dryer or work space to avoid damaging the surface. Remove the door assembly 1. Open the dryer door. 2. Remove the bottom screw from each of the 2 hinges that attach dryer door to front panel of dryer. 3. Loosen the top screw from each of the 2 hinges in Step 2. 5. Remove the 4 plastic plugs located outside the dryer door opening. 6. Install 4 plastic plugs into screw holes in the dryer left where the hinges were removed in Step 4. Reverse the strike 1. Remove the door strike from the dryer door opening. 2. Remove the cosmetic screw opposite the door strike. A B A. Door strike B. Cosmetic screw A 3. Reinstall the door strike and cosmetic screw on the opposite B side of the dryer door opening from where they were removed. NOTE: Door strike and plugs must be on the same side of the dryer door opening. Reinstall the door 1. Remove the 4 screws and 2 hinges from the dryer door. A 2. Replace the 4 screws in the same holes. B A. Loosen these screws. B. Remove these screws. 4. Remove the dryer door and the hinges by lifting upward on the door. Lay the door on a flat, protected surface, with the inside of the door facing up. Remove remaining 2 loose screws from dryer front panel. 14
-
 1
1 -
2
-
3
-
4
-
5
-
6
-
7
-
8
-
 9
9 -
 10
10 -
 11
11 -
 12
12 -
 13
13 -
 14
14 -
 15
15 -
 16
16
 |
 |
