Whirlpool WFE550S0LZ Control Guide - Page 7
Positioning Racks and Bakeware, Baking, Roasting, Broiling
 |
View all Whirlpool WFE550S0LZ manuals
Add to My Manuals
Save this manual to your list of manuals |
Page 7 highlights
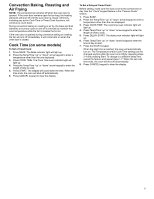
9. Press the Start keypad while "SAb" is flashing to enter Sabbath mode; otherwise, the entire cycle cancels out. "SAb" will stop flashing and remain on in the display. The oven is now in Sabbath mode and is Sabbath compliant. The On and Delay indicator lights will be displayed. When the start time is reached, the Bake, On, and Cook Time indicator lights will automatically turn on. When the set cook time ends, the oven will shut off automatically and the indicator lights will turn off, indicating the end of the cycle. Pressing the Cancel keypad at any time returns the oven to the normal cooking mode (not Sabbath mode compliant). Positioning Racks and Bakeware To move a rack, pull it out to the stop position, raise the front edge, and then lift it out. Use the following illustration and chart as a guide for positioning racks. Rack Position 5 4 3 3 or 4 1 or 2 Type of Food Broiling/searing meats, hamburgers, steaks, or toast. Broiling thicker cuts of meat, poultry, fish. Air fry basket Frozen prepackaged foods, most baked goods, and casseroles. Large roasts or poultry Multiple Rack Cooking 2-rack: Use rack positions 2 and 4 or 2 and 5. Bakeware To cook food evenly, hot air must be able to circulate. Allow 2" (5 cm) of space around bakeware and oven walls. Make sure that no bakeware piece is directly over another. Air Fry Basket When using the Air Fry feature, position the air fry basket on the top of a large baking sheet. Place basket and sheet in the middle of the oven to increase air flow and circulation. Avoid using more than one basket to avoid uneven cooking. Baking and Roasting Preheating When beginning a Bake cycle, the oven will begin preheating after Start is pressed. The oven will take approximately 12 to 15 minutes to reach 350°F (177°C) with all of the oven racks provided with your oven inside the oven cavity. Higher temperatures will take longer to preheat. The preheat cycle rapidly increases the oven temperature. The actual oven temperature will go above your set temperature to offset the heat lost when your oven door is opened to insert food. This ensures that when you place your food in the oven, the oven will begin at the proper temperature. Insert your food when the preheat tone sounds. Do not open the door during preheat before the tone sounds. Oven Temperature While in use, the oven elements will cycle on and off as needed to maintain a consistent temperature, but they may run slightly hot or cool at any point in time due to this cycling. Opening the oven door while in use will release the hot air and cool the oven which could impact the cooking time and performance. It is recommended to use the oven light to monitor cooking progress. NOTE: On models with convection, the convection fan may run in the non-convection Bake mode to improve oven performance. The convection fan will shut off when the oven door is opened. If the oven door remains open for too long, the heating elements will shut off until the oven door is closed. All timers, including any active Cook Time or Timed Cook functions, will continue to count down. Temperature Management System The Temperature Management System electronically regulates the oven heat levels during preheat and bake to maintain a precise temperature range for optimal cooking results. The bake and broil elements or burners cycle on and off in intervals. On convection range models, the fan will run while preheating and may be cycled on and off for short intervals during bake to provide the best results. This feature is automatically activated when the oven is in use. Before baking and roasting, position racks according to the "Positioning Racks and Bakeware" section. When roasting, it is not necessary to wait for the oven preheat cycle to end before putting food in unless it is recommended in the recipe. Broiling NOTE: The convection fan will shut off when the oven door is opened. If the oven door remains open for too long, the heating elements will shut off until the oven door is closed. All timers, including any active Cook Time or Timed Cook functions, will continue to count down. When broiling, preheat the oven for two minutes before putting food in unless recommended otherwise in the recipe. Position food on grid in a broiler pan, then place it in the center of the oven rack. IMPORTANT: Close the door to ensure proper broiling temperature. Changing the temperature when broiling allows more precise control when cooking. The lower the broil setting is, the slower the cooking. Thicker cuts and unevenly shaped pieces of meat, fish, and poultry may cook better at lower broil settings. Use racks 4 or 5 for broiling. Refer to the "Positioning Racks and Bakeware" section for more information. On lower settings, the broil element will cycle on and off to maintain the proper temperature. � For best results, use a broiler pan and grid. It is designed to drain juices and help avoid spatter and smoke. If you would like to purchase a broiler pan, one may be ordered. Please refer to the Quick Start Guide for contact information. NOTE: Odors and smoke are normal the first few times the oven is used or if the oven is heavily soiled. 7
-
 1
1 -
 2
2 -
 3
3 -
 4
4 -
 5
5 -
 6
6 -
 7
7 -
 8
8 -
 9
9 -
 10
10 -
 11
11 -
 12
12 -
13
-
14
-
15
-
16
-
17
-
18
-
19
-
20
-
21
-
22
-
23
-
24
-
25
-
26
-
27
 |
 |
