Whirlpool WFG510S0AD Installation Guide - Page 20
Complete Installation LP Gas to Natural Gas
 |
View all Whirlpool WFG510S0AD manuals
Add to My Manuals
Save this manual to your list of manuals |
Page 20 highlights
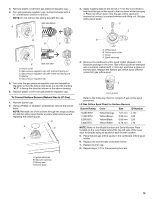
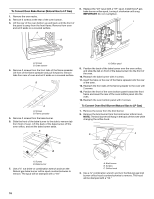
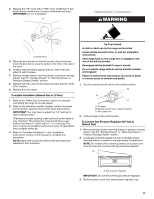
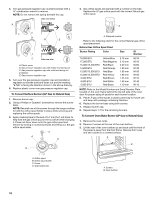
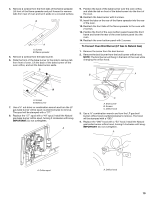
5. Place the broil burner on the broil burner orifice hood and insert the broil burner ceramic igniter in the hole in the rear of the oven. 6. Position the broil burner against the top of the oven and attach it with 2 screws. 7. Replace storage drawer, warming drawer or premium storage drawer. See the "Storage Drawer" or "Warming Drawer or Premium Storage Drawer" section. 8. Replace the oven door. See the "Oven Door" section. 9. Replace the oven racks. Complete Installation (LP Gas to Natural Gas) 1. Refer to the "Make Gas Connection" section for properly connecting the range to the gas supply. 2. Refer to the "Electronic Ignition System" section for proper burner ignition, operation, and burner flame adjustments. IMPORTANT: You may have to adjust the "LO" setting for each cooktop burner. Checking for proper cooktop, bake and broil burner flame is very important. Natural gas flames do not have yellow tips. 3. Refer to "Complete Installation" in the "Installation Instructions" section of this manual to complete this procedure. NOTE: Make sure to save the orifices that have just been replaced in the conversion. W10403809B © 2012. All rights reserved. AQUALIFT is a trademark of Whirlpool, U.S.A. 1/12 Printed in U.S.A.
-
 1
1 -
2
-
3
-
4
-
5
-
6
-
7
-
8
-
9
-
10
-
11
-
12
-
13
-
14
-
 15
15 -
 16
16 -
 17
17 -
 18
18 -
 19
19 -
 20
20
 |
 |
