Whirlpool WFG520S0FS Use & Care Guide - Page 7
Grates, Burner Size, Cookware, Recommended Use, Small, Medium, Large, IMPORTANT - model
 |
View all Whirlpool WFG520S0FS manuals
Add to My Manuals
Save this manual to your list of manuals |
Page 7 highlights
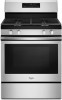
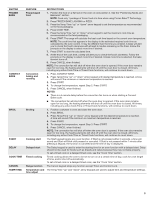
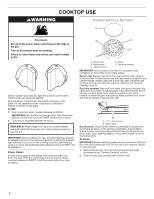
3. Clean clogged burner ports with a straight pin as shown. Do not enlarge or distort the port. Do not use a wooden toothpick. If the burner needs to be adjusted, contact a trained repair specialist. Burner Size Select a burner that best fits your cookware. See the following illustration and chart. Back of Range Medium Small 4. Replace the burner cap, making sure the alignment pins are properly aligned with the burner cap. A Large Large B A. Incorrect B. Correct 5. Turn on the burner. If the burner does not light, check cap alignment. If the burner still does not light, do not service the sealed burner yourself. Contact a trained repair specialist. Grates The grates on this range cover the full width of the cooktop. The 2 grates may interlock (on some models), using the hook formed into 1 end of both grates. The flat end of 1 grate drops onto the hook on the other grate as shown in the following illustration. On some models, the 2 grates are identical and can be used on either the left or right side of the cooktop. Grates that are designed for use on only 1 side of the cooktop will have either "LEFT" or "RIGHT" embossed on the bottom side of the grate. Front of Range Burner Size Small Medium Large Recommended Use ■■ Low-heat cooking ■■ Melting chocolate or butter ■■ Multipurpose burner ■■ For large cookware Cookware IMPORTANT: Do not leave empty cookware on a hot surface cooking area, element, or surface burner. Ideal cookware should have a flat bottom, straight sides, and a well-fitting lid, and the material should be of medium-to-heavy thickness. Rough finishes may scratch the cooktop or grates. Aluminum and copper may be used as a core or base in cookware. Cookware material is a factor in how quickly and evenly heat is transferred which affects cooking results. Cookware with nonstick surfaces should not be used under the broiler. Check for flatness by placing the straight edge of a ruler across the bottom of the cookware. While you rotate the ruler, no space or light should be visible between it and the cookware. 1 2 3 1 4 5 6 2 7 8 3 9 1 0 1 1 4 1 2 1 3 5 1 4 1 5 1 6 6 1 7 1 8 7 1 9 2 0 7
-
 1
1 -
 2
2 -
 3
3 -
 4
4 -
 5
5 -
 6
6 -
 7
7 -
 8
8 -
 9
9 -
 10
10 -
 11
11 -
 12
12 -
13
-
14
-
15
-
16
-
17
-
18
-
19
-
20
-
21
-
22
-
23
-
24
-
25
-
26
-
27
-
28
-
29
-
30
-
31
-
32
-
33
-
34
-
35
-
36
-
37
-
38
-
39
-
40
 |
 |
