Whirlpool WGD4985EW Installation Guide - Page 17
Lift door off top screws, Remove bottom screws, Remove screws from hinges, Rotate outer door, Remove
 |
View all Whirlpool WGD4985EW manuals
Add to My Manuals
Save this manual to your list of manuals |
Page 17 highlights
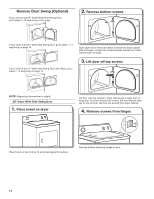
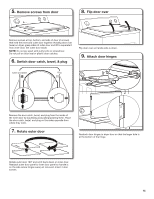
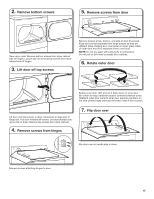
2. Remove bottom screws 5. Remove screws from door Open dryer door. Remove bottom screws from dryer cabinet side of hinges. Loosen (do not remove) top screws from dryer cabinet side of hinges. 3. Lift door off top screws Remove screws at top, bottom, and side of door (6 screws). Keep door screws separate from hinge screws as they are different sizes. Holding door over towel on dryer, grasp sides of outer door and lift to separate it from inner door. NOTE: Do not pry apart with putty knife or screwdriver. Do not pull on door seal or plastic door catches. 6. Rotate outer door Lift door until top screws in dryer cabinet are in large part of hinge slot. Pull door forward off screws. Set door (handle side up) on top of dryer. Remove top screws from dryer cabinet. 4. Remove screws from hinges Rotate outer door 180º and set it back down on inner door. Be certain to keep cardboard spacer centered between doors. Reattach outer door panel to inner door panel so handle is on the side where hinges were just removed. Insert 6 door screws. 7. Flip door over Flip door over so handle side is down. Remove screws attaching hinges to door. 17
-
 1
1 -
2
-
3
-
4
-
5
-
6
-
7
-
8
-
9
-
10
-
11
-
 12
12 -
 13
13 -
 14
14 -
 15
15 -
 16
16 -
 17
17 -
 18
18 -
 19
19 -
 20
20 -
 21
21 -
 22
22 -
23
-
24
-
25
-
26
-
27
-
28
-
29
-
30
-
31
-
32
-
33
-
34
-
35
-
36
-
37
-
38
-
39
-
40
-
41
-
42
-
43
-
44
 |
 |
