Whirlpool WGD72HEDW Use & Care Guide - Page 16
If you experience, Possible Causes, Solution
 |
View all Whirlpool WGD72HEDW manuals
Add to My Manuals
Save this manual to your list of manuals |
Page 16 highlights
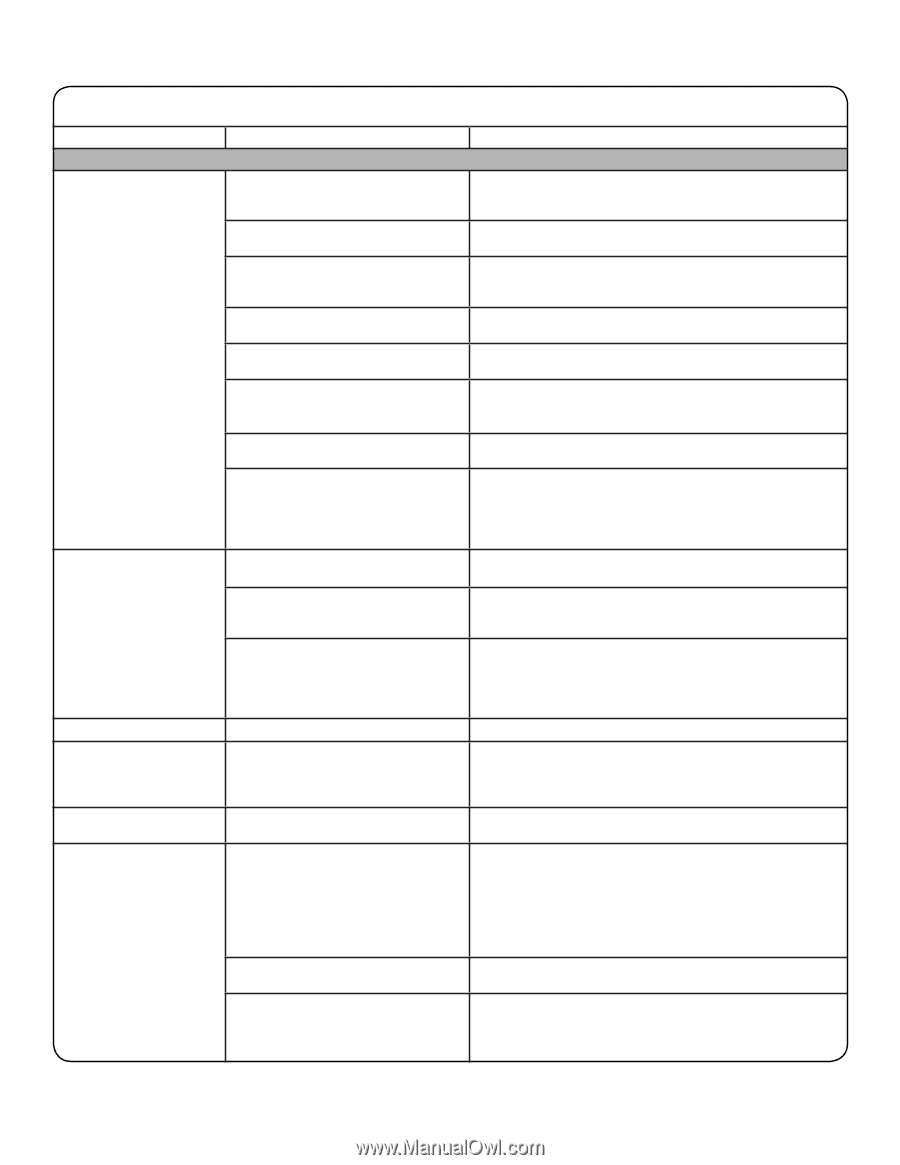
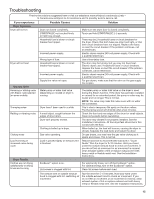
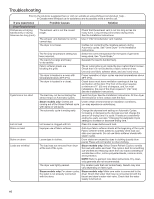
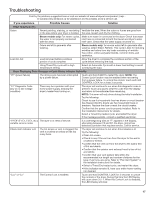
Troubleshooting First try the solutions suggested here or visit our website at www.whirlpool.com/product_help - In Canada www.whirlpool.ca for assistance and to possibly avoid a service call. If you experience Possible Causes Solution Dryer Results (cont.) Clothes are not drying satisfactorily or drying times are too long (cont.) The exhaust vent is not the correct length. The exhaust vent diameter is not the correct size. The dryer is not level. The Air Only temperature setting has been selected. The load is too large and heavy to dry quickly. Fabric softener sheets are blocking the grille. The dryer is located in a room with temperature below 45ºF (7ºC). The dryer is located in a closet. Cycle time is too short The load may not be contacting the sensor strips on Automatic Cycles. Check that the exhaust vent is not too long or has too many turns. Long venting will increase drying times. See the Installation Instructions. Use 4" (102 mm) diameter vent material. Clothes not contacting the moisture sensors during Automatic cycles. See "Level Dryer" in the Installation Instructions. Select the correct temperature for the types of garments being dried. See "Cycle Guide." Separate the load to tumble freely. The air outlet grille is just inside the door, behind the lint screen. Check that it is not blocked by a fabric softener sheet. Use only one fabric softener sheet, and use it only once. Proper operation of dryer cycles requires temperatures above 45ºF (7ºC). Closet doors must have ventilation openings at the top and bottom of the door. The front of the dryer requires a minimum of 1" (25 mm) of airspace, and, for most installations, the rear of the dryer requires 5" (127 mm). See the Installation Instructions. Level the dryer. See the Installation Instructions. All four dryer feet should be in firm contact with the floor. Lint on load Steam models only: Clothes are coming out of the Steam Refresh cycle with damp or wet spots. The automatic cycle is ending early. Lint screen is clogged with lint. Under certain environmental or installation conditions, you may experience underdrying. Change the dryness level setting on Automatic Cycles. Increasing or decreasing the dryness level will change the amount of drying time in a cycle. If loads are consistently ending too early, see also "Changing the Automatic Cycle settings to increase or decrease drying time." Clean lint screen before each load. Stains on load Stains on drum Loads are wrinkled Improper use of fabric softener. Add dryer fabric softener sheets at the beginning of the cycle. Fabric softener sheets added to a partially dried load can stain your garments. Do not use fabric softener sheets with steam cycles. Loose dyes in clothes. Drum stains are caused by dyes in clothing (usually blue jeans). These will not transfer to other clothing. The load was not removed from dryer at the end of the cycle. Steam models only: Select Steam Refresh Cycle to tumble the load with water and heat. This cycle is best for smoothing out wrinkles and reducing odors from dry loads consisting of wrinkle-free cotton, cotton-polyester blends, common knits, and synthetics. NOTE: Refer to garment care label instructions. Dry-cleanonly garments are not recommended. The dryer was tightly packed. Dry smaller loads that can tumble freely. Results may also vary depending on fabric type. Steam models only: For steam cycles, the water is not properly connected with the dryer. Steam models only: Make sure water is connected to the dryer. Check that water inlet hose is connected to both the faucet and dryer's water inlet valve. Check that the water supply is turned on. 16
-
 1
1 -
2
-
3
-
4
-
5
-
6
-
7
-
8
-
9
-
10
-
 11
11 -
 12
12 -
 13
13 -
 14
14 -
 15
15 -
 16
16 -
 17
17 -
 18
18 -
 19
19 -
 20
20 -
 21
21 -
22
-
23
-
24
-
25
-
26
-
27
-
28
-
29
-
30
-
31
-
32
-
33
-
34
-
35
-
36
-
37
-
38
-
39
-
40
 |
 |