Whirlpool WGD9600TA Installation Instructions - Page 10
Swarning
 |
View all Whirlpool WGD9600TA manuals
Add to My Manuals
Save this manual to your list of manuals |
Page 10 highlights
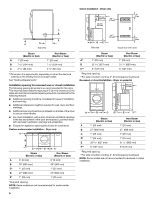
Dryer gas pipe ■ The gas pipe that comes out through the rear of your dryer has a 3/8" male pipe thread. B *6¼" (159 mm) 3. Open the shutoff valve in the supply line. The valve is open when the handle is parallel to the gas pipe. A B 1½" A (38 mm) A. 1/2" NPT gas supply line B. 3/8" NPT dryer pipe *NOTE: If the dryer is mounted on a pedestal, the gas pipe height must be an additional 10" (254 mm) or 15.5" (394 mm) from the floor, depending on the pedestal model. For a garage installation, the gas pipe height must be an additional 18" (457 mm) from the floor. Make Gas Connection 1. Remove the red cap from the gas pipe. 2. Using a wrench to tighten, connect the gas supply to the dryer. Use pipe-joint compound on the threads of all non-flared male fittings. If flexible metal tubing is used, be sure there are no kinks. A B A. Flared male fitting B. Non-flared male fitting NOTE: For LP gas connections, you must use pipe-joint compound resistant to the action of LP gas. Do not use TEFLON®† tape. A combination of pipe fittings must be used to connect the dryer to the existing gas line. Shown is a recommended connection. Your connection may be different, according to the supply line type, size and location. D A B A. 3/8" flexible gas connector B. 3/8" dryer pipe C C. 3/8" to 3/8" pipe elbow D. 3/8" pipe-to-flare adapter fitting A. Closed valve B. Open valve 4. Test all connections by brushing on an approved noncorrosive leak-detection solution. Bubbles will show a leak. Correct any leak found. Electrical Requirements WARNING Electrical Shock Hazard Plug into a grounded 3 prong outlet. Do not remove ground prong. Do not use an adapter. Do not use an extension cord. Failure to follow these instructions can result in death, fire, or electrical shock. ■ 120 Volt, 60 Hz., AC only, 15- or 20-amp fused electrical supply is required. A time-delay fuse or circuit breaker is recommended. It is also recommended that a separate circuit serving only this dryer be provided. GROUNDING INSTRUCTIONS ■ For a grounded, cord-connected dryer: This dryer must be grounded. In the event of malfunction or breakdown, grounding will reduce the risk of electric shock by providing a path of least resistance for electric current. This dryer is equipped with a cord having an equipmentgrounding conductor and a grounding plug. The plug must be plugged into an appropriate outlet that is properly installed and grounded in accordance with all local codes and ordinances. WARNING: Improper connection of the equipment- grounding conductor can result in a risk of electric shock. Check with a qualified electrician or service representative or personnel if you are in doubt as to whether the dryer is properly grounded. Do not modify the plug provided with the dryer: if it will not fit the outlet, have a proper outlet installed by a qualified electrician. SAVE THESE INSTRUCTIONS †®TEFLON is a registered trademark of E.I. Du Pont De Nemours and Company. 10
-
 1
1 -
2
-
3
-
4
-
 5
5 -
 6
6 -
 7
7 -
 8
8 -
 9
9 -
 10
10 -
 11
11 -
 12
12 -
 13
13 -
 14
14 -
 15
15 -
16
-
17
-
18
-
19
-
20
-
21
-
22
-
23
-
24
-
25
-
26
-
27
-
28
-
29
-
30
-
31
-
32
 |
 |
