Whirlpool WMH32519H Installation Instructions - Page 11
Warning
 |
View all Whirlpool WMH32519H manuals
Add to My Manuals
Save this manual to your list of manuals |
Page 11 highlights
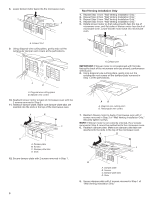
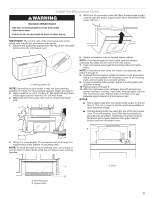
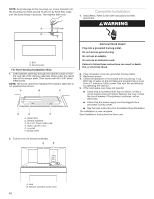
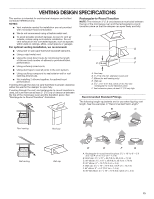
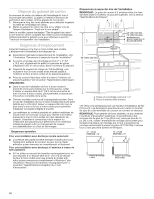
Install the Microwave Oven WARNING 5. With front of microwave oven still tilted, thread power supply cord through the power supply cord hole in the bottom of the upper cabinet. Excessive Weight Hazard Use two or more people to move and install microwave oven. Failure to do so can result in back or other injury. IMPORTANT: The control side of the microwave oven is the heavy side. Handle the microwave oven gently. 1. Remove the 2 packing spacers from the top of the vent grille before using the microwave oven. A A. Packing spacers (2) NOTE: Depending on your model, it may not have packing spacers. If it does not have packing spacers, begin with step 2. 2. Place a washer on each 1/4-20 x 3" flat-head bolt and place inside upper cabinet near the 3/8" (10 mm) holes. 3. Make sure the microwave oven door is closed and taped shut. 6. Rotate microwave oven up toward upper cabinet. NOTE: If venting through the wall, make sure the damper assembly fits easily into the vent in the wall cutout. 7. Push microwave oven against mounting plate and hold in place. NOTE: If microwave oven does not need to be adjusted, skip steps 7 through 9. 8. If adjustment is required, rotate microwave oven downward. Using 2 or more people, lift microwave oven off of mounting plate, and set aside on a covered surface. 9. Loosen mounting plate screws. Adjust mounting plate and retighten screws. 10. Repeat steps 3 through 6. 11. With the microwave oven centered, and with at least one person holding it in place, insert bolts through upper cabinet into microwave oven. Tighten bolts until there is no gap between upper cabinet and microwave oven. NOTES: ■■ Some upper cabinets may require bolts longer or shorter than 3" (7.6 cm). Longer or shorter bolts are available at most hardware stores. ■■ Overtightening bolts may warp the top of the microwave oven. To avoid warping, wood filler blocks (installer to provide) may be added. The blocks must be the same thickness as the space between the upper cabinet bottom and the microwave oven. A 4. Using 2 or more people, lift microwave oven and hang it on support tabs at the bottom of mounting plate. NOTE: To avoid damage to the microwave oven, do not grip or use the door or door handle while the microwave oven is being handled. A B A. Mounting plate B. Support tabs A. Bolts A. Bolts 11
-
 1
1 -
2
-
3
-
4
-
5
-
 6
6 -
 7
7 -
 8
8 -
 9
9 -
 10
10 -
 11
11 -
 12
12 -
 13
13 -
 14
14 -
 15
15 -
 16
16 -
17
-
18
-
19
-
20
-
21
-
22
-
23
-
24
-
25
-
26
-
27
-
28
 |
 |
