Xerox 4510N User Guide - Page 116
Close the rear cover., paper completely out of the printer.
 |
UPC - 095205427813
View all Xerox 4510N manuals
Add to My Manuals
Save this manual to your list of manuals |
Page 116 highlights
Clearing Paper Jams 3. Remove the jammed paper. Confirm that all paper fragments are removed. 4510-024 4. If you do not find jammed paper in Step 3, open the fuser exit cover and pull the jammed paper completely out of the printer. 4510-025 Note: When you let go of the fuser exit cover it will return to it's original position. 5. Close the rear cover. 4510-026 Phaser® 4510 Laser Printer 6-10
-
 1
1 -
2
-
3
-
4
-
5
-
6
-
7
-
8
-
9
-
10
-
11
-
12
-
13
-
14
-
15
-
16
-
17
-
18
-
19
-
20
-
21
-
22
-
23
-
24
-
25
-
26
-
27
-
28
-
29
-
30
-
31
-
32
-
33
-
34
-
35
-
36
-
37
-
38
-
39
-
40
-
41
-
42
-
43
-
44
-
45
-
46
-
47
-
48
-
49
-
50
-
51
-
52
-
53
-
54
-
55
-
56
-
57
-
58
-
59
-
60
-
61
-
62
-
63
-
64
-
65
-
66
-
67
-
68
-
69
-
70
-
71
-
72
-
73
-
74
-
75
-
76
-
77
-
78
-
79
-
80
-
81
-
82
-
83
-
84
-
85
-
86
-
87
-
88
-
89
-
90
-
91
-
92
-
93
-
94
-
95
-
96
-
97
-
98
-
99
-
100
-
101
-
102
-
103
-
104
-
105
-
106
-
107
-
108
-
109
-
110
-
 111
111 -
 112
112 -
 113
113 -
 114
114 -
 115
115 -
 116
116 -
 117
117 -
 118
118 -
 119
119 -
 120
120 -
 121
121 -
122
-
123
-
124
-
125
-
126
-
127
-
128
-
129
-
130
-
131
-
132
-
133
-
134
-
135
-
136
-
137
-
138
-
139
-
140
-
141
-
142
-
143
-
144
-
145
 |
 |

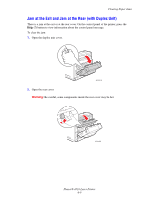
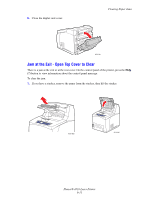
Clearing Paper Jams
Phaser® 4510 Laser Printer
6-10
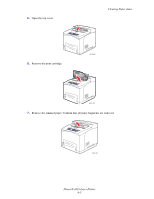
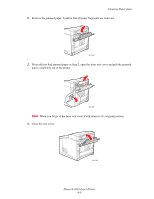
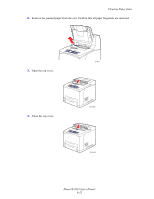
3.
Remove the jammed paper. Confirm that all paper fragments are removed.
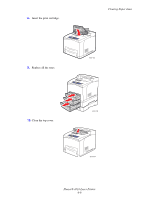
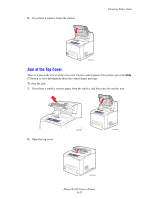
4.
If you do not find jammed paper in Step 3, open the fuser exit cover and pull the jammed
paper completely out of the printer.
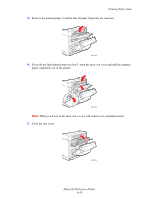
Note:
When you let go of the fuser exit cover it will return to it’s original position.
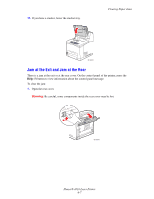
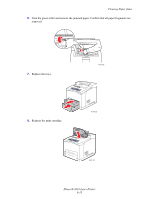
5.
Close the rear cover.
4510-024
4510-025
4510-026