Xerox 850DX AccXES Web Printer Manager Tool User Guide for AccXES (for firmwar - Page 28
Network Menu - machine
 |
UPC - 042215454865
View all Xerox 850DX manuals
Add to My Manuals
Save this manual to your list of manuals |
Page 28 highlights
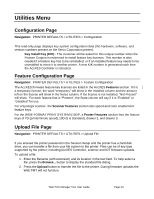
Network Menu EtherTalk Page (8830/8825 only) Navigation: PRINTER DEFAULTS > NETWORK > EtherTalk If you entered the printer password in the Session Setup, you can change the following EtherTalk parameters in the printer: 1. Enabled - Click on this check box to enable/disable EtherTalk on the printer. 2. EtherTalk Zone - Enter the AppleTalk zone name (up to 31 characters) upon which the printer operates in this text box. Enter * (asterisk) to use the EtherTalk router's default zone. 3. EtherTalk Phase - Click on the Phase 1 or Phase 2 radio button to select the EtherTalk phase. 4. AppleTalk Printer Name - Enter the printer name (up to 31 characters) for the AppleTalk protocols in this text box. 5. Press the Update Printer button to send the requested parameter changes to the printer. Note that if the Enabled box is not checked, the parameters will be updated but EtherTalk will remain inactive on the printer. NetBEUI Page (8830/8825 only) Navigation: PRINTER DEFAULTS > NETWORK > NetBEUI If you entered the printer password in the Session Setup, you can change the following NetBEUI parameters in the printer: 1. Enabled - Click on this check box to enable/disable NetBEUI on the printer. When checked, NetBEUI is enabled. 2. NetBEUI Group - Enter the group name (up to 15 characters) of the printer in this text field. 3. NetBEUI Machine Name - The field displays the NetBEUI Machine Name for the printer. This is a read-only field. 4. NetBEUI Remark - In this text box, enter the Remark string (up to 47 characters) for the NetBEUI protocol. This field is used to identify the printer with a name that is recognizable on your network. 5. Press the Update Printer button to send the requested parameter changes to the printer. Note that if the Enabled box is not checked, the parameters will be updated but NetBEUI will remain inactive on the printer. Page 28 Web Print Manager Tool User Guide
-
 1
1 -
2
-
3
-
4
-
5
-
6
-
7
-
8
-
9
-
10
-
11
-
12
-
13
-
14
-
15
-
16
-
17
-
18
-
19
-
20
-
21
-
22
-
 23
23 -
 24
24 -
 25
25 -
 26
26 -
 27
27 -
 28
28 -
 29
29 -
 30
30 -
 31
31 -
 32
32 -
 33
33 -
34
-
35
-
36
-
37
-
38
-
39
-
40
-
41
-
42
-
43
-
44
-
45
-
46
-
47
-
48
-
49
-
50
-
51
-
52
-
53
-
54
-
55
-
56
-
57
-
58
-
59
-
60
-
61
 |
 |
