Xerox 8560MFP Advanced Features Guide - Page 45
Have Disk, Browse, Share Name, Share, Windows 2000, Windows XP, and Windows Server 2003
 |
UPC - 095205428841
View all Xerox 8560MFP manuals
Add to My Manuals
Save this manual to your list of manuals |
Page 45 highlights
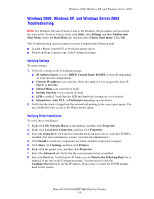
Windows 2000, Windows XP, and Windows Server 2003 Configuring the System To configure the system: 1. Insert the Software and Documentation CD-ROM into the computer's CD-ROM drive and click Have Disk. 2. Click the Browse button, and then select the directory which contains the Windows 2000 or Windows XP drivers. 3. Select the *.INF file, and then click Open. 4. Verify that the path and filename are correct, and then click OK. 5. Enter a name for the system and select whether you want that system to be the default. Click Next. 6. Select one of these options: ■ If the system is not shared, click Next. ■ If the system is shared, enter a Share Name, check the Share box, and then click Next. 7. Click Next. Phaser® 8510/8560MFP Multifunction Product 3-8
-
 1
1 -
2
-
3
-
4
-
5
-
6
-
7
-
8
-
9
-
10
-
11
-
12
-
13
-
14
-
15
-
16
-
17
-
18
-
19
-
20
-
21
-
22
-
23
-
24
-
25
-
26
-
27
-
28
-
29
-
30
-
31
-
32
-
33
-
34
-
35
-
36
-
37
-
38
-
39
-
 40
40 -
 41
41 -
 42
42 -
 43
43 -
 44
44 -
 45
45 -
 46
46 -
 47
47 -
 48
48 -
 49
49 -
 50
50 -
51
-
52
-
53
-
54
-
55
-
56
-
57
-
58
-
59
-
60
-
61
-
62
-
63
-
64
-
65
-
66
-
67
-
68
-
69
-
70
-
71
-
72
-
73
-
74
-
75
-
76
-
77
-
78
-
79
-
80
-
81
-
82
-
83
-
84
-
85
-
86
-
87
-
88
-
89
-
90
-
91
-
92
-
93
-
94
-
95
-
96
-
97
-
98
-
99
-
100
 |
 |
