Xerox C2424 User Guide Section 2: Loading Media - Page 16
Paper Supply, Tray 2
 |
UPC - 095205676532
View all Xerox C2424 manuals
Add to My Manuals
Save this manual to your list of manuals |
Page 16 highlights
Loading Media in Trays 2, 3, and 4 4. Insert the tray into the tray slot and push it completely to the back of the system. 2424-004 5. If you changed the paper type, select the tray paper type: a. On the control panel, press the Copy or Print button. b. In the menu, select Paper Supply, then press the Enter button. c. Select Tray 2, 3, or 4 Paper Type, then press the Enter button. d. Select the appropriate paper type, then press the Enter button to save your selection. 6. Adjust the output tray for short or long media. 2424-186 2424-056 For media shorter than 190 mm (7.5 in.), flip up the For media longer than 297 mm (11.7 in.), paper stop. extend the output tray. WorkCentre® C2424 Copier-Printer 2-16
-
 1
1 -
2
-
3
-
4
-
5
-
6
-
7
-
8
-
9
-
10
-
 11
11 -
 12
12 -
 13
13 -
 14
14 -
 15
15 -
 16
16
 |
 |

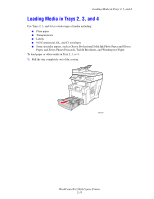
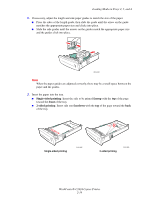
Loading Media in Trays 2, 3, and 4
WorkCentre® C2424 Copier-Printer
2-16
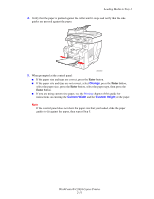
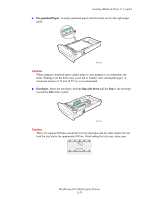
4.
Insert the tray into the tray slot and push it completely to the back of the system.
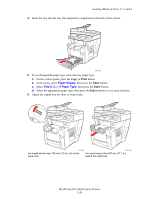
5.
If you changed the paper type, select the tray paper type:
a.
On the control panel, press the
Copy
or
Print
button.
b.
In the menu, select
Paper Supply
,
then press the
Enter
button.
c.
Select
Tray 2, 3,
or
4 Paper Type
,
then press the
Enter
button.
d.
Select the appropriate paper type, then press the
Enter
button to save your selection.
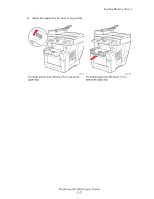
6.
Adjust the output tray for short or long media.
For media shorter than 190 mm (7.5 in.), flip up the
paper stop.
For media longer than 297 mm (11.7 in.),
extend the output tray.
2424-004
2424-186
2424-056