Xerox F110MB Installation Guide - Page 1
Xerox F110MB Manual
 |
View all Xerox F110MB manuals
Add to My Manuals
Save this manual to your list of manuals |
Page 1 highlights
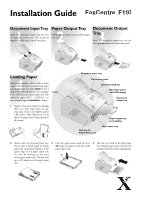
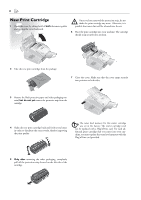
Installation Guide Document Input Tray Insert the document input tray into the two openings in the cover. The document support should snap securely into place. Paper Output Tray Pull the paper output tray out of the paper tray cover. Document Output Tray Insert the document output tray into the two openings under the operation panel. Loading Paper Before your machine will be ready to make copies or receive faxes, you must load paper into the machine. Use paper letter, 8.5 x 11 Inch (216 × 279 millimetres). Your machine works with normal copier paper and with typewriter paper (0.13 - 0,2 lb/m2) (see user manual chapter Installation / Paper). Cover 1 Separate the paper sheets by fanning them out, then align them by tapping edge of the stack lightly against a flat surface. This will prevent several sheets of paper from being drawn in all at once. Document input tray Document guide Document feed slot Operation panel with LCD display Document output tray Opening for Plug'n'Print card Paper output tray (extendable) Paper input tray 2 Remove the cover from the paper tray. 3 Press the paper down until the lever 4 Place the cover back on the paper input Put in only as much paper as will fit (A) snaps into place at the rear of the tray. Push the paper input tray into the under the raised limit markers on the paper input tray. machine all the way to the stopping point. upper edge of the paper input tray (see also the drawings on the cover of the paper input tray). You can load up to 250 sheets into the paper input tray.
-
 1
1 -
 2
2 -
 3
3 -
 4
4
 |
 |
