Xerox F110MB Installation Guide - Page 2
New Print Cartridge - toner
 |
View all Xerox F110MB manuals
Add to My Manuals
Save this manual to your list of manuals |
Page 2 highlights
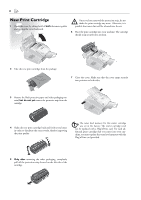
II New Print Cartridge 1 Open the cover by taking hold of both document guides and tipping the cover backward. ÆOnce you have removed the protection strip, do not shake the print cartridge any more. Otherwise, it is possible that toner dust will be released into the air. 6 Place the print cartridge into your machine. The cartridge should snap securely into position. 2 Take the new print cartridge from the package. 7 Close the cover. Make sure that the cover snaps securely into position on both sides. 3 Remove the black protective paper and other packaging material, but do not yet remove the protective strip from the cartridge. 4 Shake the new print cartridge back and forth several times in order to distribute the toner evenly, thereby improving the print quality. The toner level memory for this starter cartridge ¡was set at the factory. The starter cartridge need not be updated with a Plug'n'Print card. For each additional print cartridge that you insert into your machine, you must update the toner level memory with the Plug'n'Print card provided. 5 Only after removing the other packaging, completely pull off the protection strip located on the left side of the cartridge
-
 1
1 -
 2
2 -
 3
3 -
 4
4
 |
 |
