Yamaha 6160 Owner's Manual - Page 106
Setting remote control codes
 |
UPC - 027108930176
View all Yamaha 6160 manuals
Add to My Manuals
Save this manual to your list of manuals |
Page 106 highlights
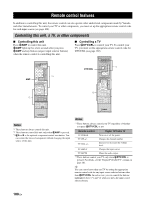
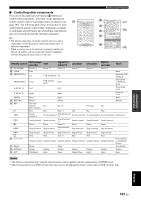
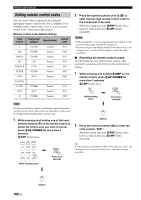
Remote control features Setting remote control codes You can control other components by setting the appropriate remote control codes. For a complete list of available remote control codes, refer to "List of remote control codes" at the end of this manual. Remote control code default settings Input source Component category Manufacturer Default code A TUNER Yamaha 5012 XM TUNER Yamaha 5009 SIRIUS TUNER Yamaha 5017 CD CD Yamaha 5013 MD/CD-R CD-R Yamaha 5001 TUNER TUNER Yamaha 5007 DVD DVD Yamaha 2000 DTV/CBL - - - V-AUX TUNER Yamaha 5011 DVR DVR Yamaha 2011 B TUNER Yamaha 5009 Note You may not be able to operate your Yamaha component even if a Yamaha remote control code is preset as listed above. In this case, try setting another Yamaha remote control code. 1 While pressing and holding one of the input selector buttons (4) on the remote control to select the control area you want to set up, press 2AV POWER for more than 3 seconds. 5AMP flashes twice. A XM SIRIUS CD MD/CD-R TUNER DVD DTV/CBL DVR V-AUX/DOCK VCR B While holding down POWER AV Press for 3 seconds 2 Press the numeric buttons (0 to 9) (G) to enter the four-digit remote control code for the component to be used. When the setting succeeds, 5AMP flashes twice; however, when it does not, 5AMP flashes repeatedly. Notes • If the manufacturer of your component has more than one code, try each of them until you find the correct one. • If you do not press any buttons within 30 seconds in step 2, the setup process is canceled. If this happens, repeat the setup procedure. ■ Resetting all remote control codes Use this feature to clear all the remote control codes previously set and reset all of them to the initial factory settings. 1 While pressing and holding 5AMP on the remote control, press 2AV POWER for more than 3 seconds. 5AMP flashes twice. AMP POWER AV While holding down Press for 3 seconds AMP flashes 2 Press the numeric buttons (6) to enter the code number "9981". When the setting succeeds, 5AMP flashes twice; however, when it does not, 5AMP flashes repeatedly. y If you do not press any buttons within 30 seconds after step 1, the clearing process is canceled. In this case, repeat the clearing procedure. 102 En AMP flashes
-
 1
1 -
2
-
3
-
4
-
5
-
6
-
7
-
8
-
9
-
10
-
11
-
12
-
13
-
14
-
15
-
16
-
17
-
18
-
19
-
20
-
21
-
22
-
23
-
24
-
25
-
26
-
27
-
28
-
29
-
30
-
31
-
32
-
33
-
34
-
35
-
36
-
37
-
38
-
39
-
40
-
41
-
42
-
43
-
44
-
45
-
46
-
47
-
48
-
49
-
50
-
51
-
52
-
53
-
54
-
55
-
56
-
57
-
58
-
59
-
60
-
61
-
62
-
63
-
64
-
65
-
66
-
67
-
68
-
69
-
70
-
71
-
72
-
73
-
74
-
75
-
76
-
77
-
78
-
79
-
80
-
81
-
82
-
83
-
84
-
85
-
86
-
87
-
88
-
89
-
90
-
91
-
92
-
93
-
94
-
95
-
96
-
97
-
98
-
99
-
100
-
 101
101 -
 102
102 -
 103
103 -
 104
104 -
 105
105 -
 106
106 -
 107
107 -
 108
108 -
 109
109 -
 110
110 -
 111
111 -
112
-
113
-
114
-
115
-
116
-
117
-
118
-
119
-
120
-
121
-
122
-
123
-
124
-
125
-
126
-
127
-
128
-
129
-
130
-
131
-
132
-
133
-
134
-
135
-
136
-
137
-
138
-
139
-
140
-
141
-
142
-
143
-
144
 |
 |
