Yamaha AW4416 Version2.0 Manual Supplement - Page 10
Recording/playing back parame, ter operations on a MIDI, sequencer, F1] MIDI Setup 1
 |
View all Yamaha AW4416 manuals
Add to My Manuals
Save this manual to your list of manuals |
Page 10 highlights
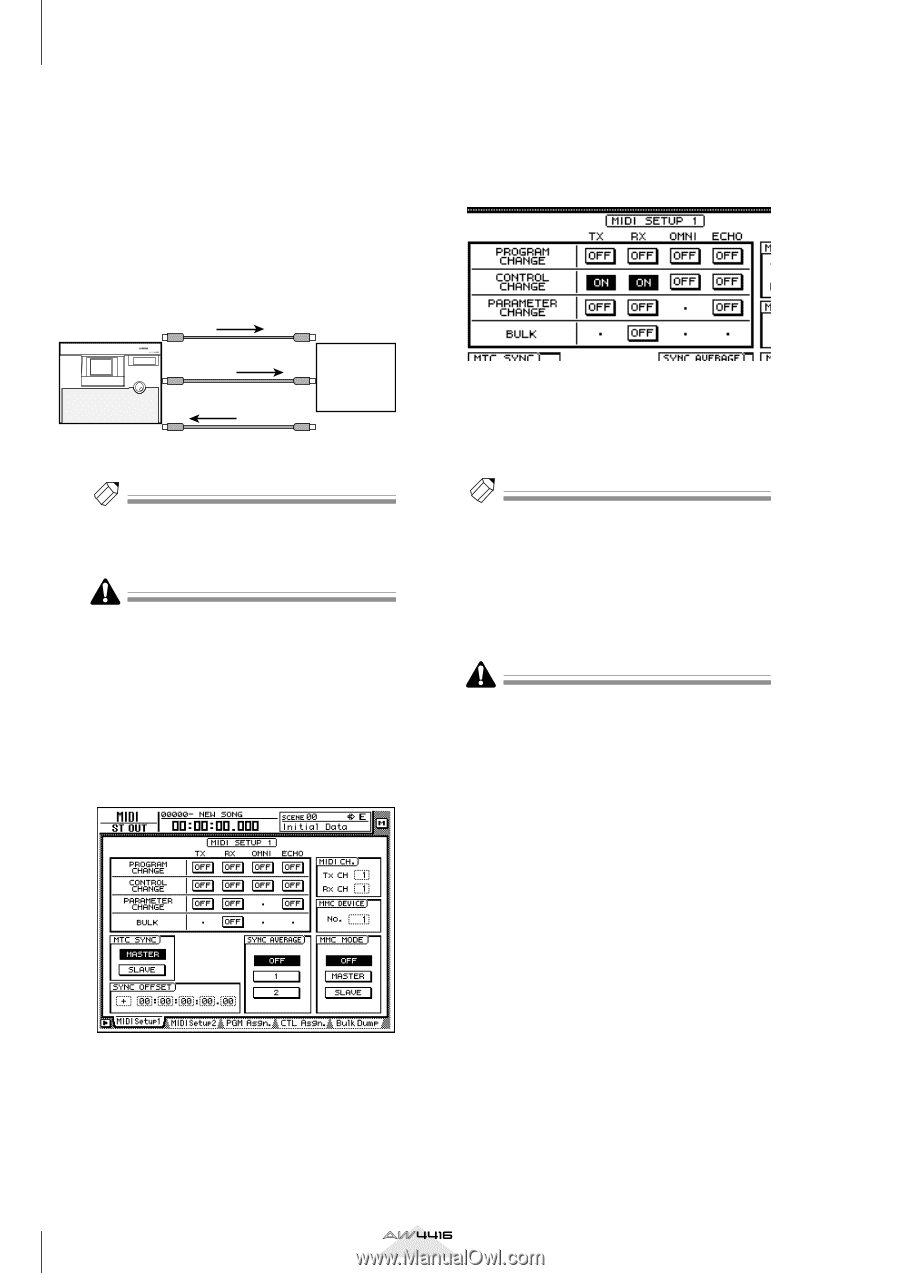
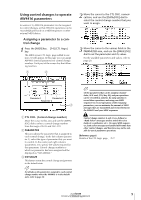
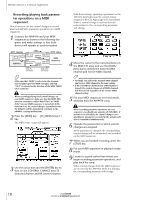
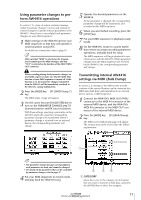
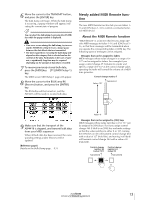
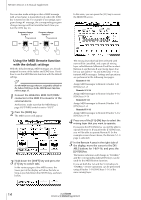
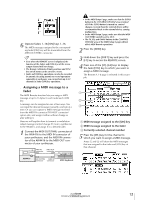
AW4416 Version 2.0 Manual Supplement s Recording/playing back parameter operations on a MIDI sequencer Here's how you can use control changes to record/ play back AW4416 parameter operations on a MIDI sequencer. 1 Connect the AW4416 and your MIDI sequencer as shown in the following diagram, and make settings so that both devices will operate in synchronization. MTC master PROFESSIONAL AUDIO WORKSTATION AW4416 MTC MTC slave MTC OUT connector Control changes MIDI IN 1 connector MIDI OUT/THRU MIDI IN 2 connector Control connector changes MIDI sequencer MIDI IN connector MIDI OUT connector Tip! Make sure that "MIDI" is selected as the transmission/reception port for MIDI messages, and that "OUT" is selected as the function of the MIDI THRU/ OUT connector. When recording/playing back control changes on your MIDI sequencer, make sure that the MIDI Thru function (sometimes called "Patch Thru" or "MIDI Echo") of your MIDI sequencer is turned off. If this function is on, the control changes transmitted from the AW4416 will be immediately sent back to the AW4416, causing malfunctions. 2 Press the [MIDI] key ¡ [F1] (MIDI Setup 1) key. The MIDI Setup 1 page will appear. 3 Use the cursor keys and the [ENTER] key to turn on the CONTROL CHANGE area TX (transmit) button and RX (receive) button. With these settings, operating a parameter on the AW4416 itself will cause the control change assigned in the CTL Asgn. page to be transmitted. When a control change is received from an external device, the corresponding parameter will change. 4 Move the cursor to the numerical boxes in the MIDI CH. area, and use the [DATA/ JOG] dial to specify the transmit MIDI channel and receive MIDI channel. Tip! • Normally you will set the transmit MIDI channel and receive MIDI channel to the same setting. • If the CONTROL CHANGE area OMNI button is turned ON, control changes of all MIDI channels will be received, regardless of the receive MIDI channel setting. 5 Put your MIDI sequencer in record mode, and play back the AW4416 song. When recording parameter operations on your sequencer, you should turn automix off (DISABLE). If automix is on (ENABLE), the control changes corresponding to parameters recorded in the automix will also be transmitted simultaneously. 6 Operate the parameters to which control changes are assigned. As the parameter is changed, the corresponding control change will be transmitted, and recorded on the MIDI sequencer. 7 When you are finished recording, press the [STOP] key. 8 Put your MIDI sequencer in playback-ready mode. 9 Locate to a point earlier than where you begin recording parameter operations, and play back the song. When control changes from the MIDI sequencer are received by the AW4416 while it is running, the corresponding parameter will change. 10 Version 2.0 Manual Supplement
-
 1
1 -
2
-
3
-
4
-
 5
5 -
 6
6 -
 7
7 -
 8
8 -
 9
9 -
 10
10 -
 11
11 -
 12
12 -
 13
13 -
 14
14 -
 15
15 -
16
-
17
-
18
-
19
-
20
-
21
-
22
-
23
-
24
-
25
-
26
-
27
-
28
-
29
-
30
-
31
-
32
-
33
-
34
-
35
-
36
-
37
-
38
-
39
-
40
-
41
-
42
-
43
-
44
-
45
-
46
-
47
-
48
 |
 |