Yamaha AX 497 Owner's Manual - Page 13
Connecting the banana plug, With the exception of Asia, Korea, U.K. - black
 |
UPC - 027108923697
View all Yamaha AX 497 manuals
Add to My Manuals
Save this manual to your list of manuals |
Page 13 highlights
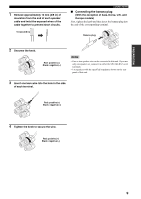
PREPARATION 1 Remove approximately 10 mm (3/8 in) of insulation from the end of each speaker cable and twist the exposed wires of the cable together to prevent short circuits. 10 mm (3/8 in) CONNECTIONS ■ Connecting the banana plug (With the exception of Asia, Korea, U.K. and Europe models) First, tighten the knob and then insert the banana plug into the end of the corresponding terminal. Banana plug 2 Unscrew the knob. Red: positive (+) Black: negative (-) Notes • One or two speaker sets can be connected to this unit. If you use only one speaker set, connect it to either the SPEAKERS A or B terminals. • Use speakers with the specified impedance shown on the rear panel of this unit. 3 Insert one bare wire into the hole in the side of each terminal. Red: positive (+) Black: negative (-) 4 Tighten the knob to secure the wire. Red: positive (+) Black: negative (-) 9
-
 1
1 -
2
-
3
-
4
-
5
-
6
-
7
-
 8
8 -
 9
9 -
 10
10 -
 11
11 -
 12
12 -
 13
13 -
 14
14 -
 15
15 -
 16
16 -
 17
17 -
 18
18 -
19
-
20
-
21
-
22
-
23
 |
 |
