Yamaha CDC-685 Owner's Manual - Page 23
Display information during pro, gramming
 |
View all Yamaha CDC-685 manuals
Add to My Manuals
Save this manual to your list of manuals |
Page 23 highlights
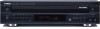
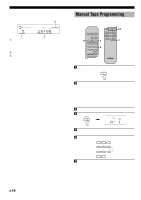
FUNCTIONS FOR RECORDING 8 When you finish the programming for side A, program the pause mode by pressing the TAPE button. TAPE * "PAUSE" lights up in the display, and after then you can begin programming for side B. 9 Repeat steps 5 and 6 to program more tracks for side B of the tape. You can select the same track again. * If "ERROR" appears in the display, the track number just selected cannot be programmed because there is no enough time remaining on side B of the tape. Start recording on the tape deck and press the w button at the same time. The unit will pause at the end of side A of the tape. Turn the tape over to side B. Resume recording and, at the same time, press the w or d button. Notes • In steps 7 and 9, even if "ERROR" appears in the display, you can program another track of which time is shorter than the remaining time on the side of the tape. At this time, if any other track number lights up in the display, you can program it. • CD synchronized recording function can be used if your tape deck is compatible with it. In this case, in steps 10 and 11, press the SYNCHRO button and then press the w button. Recording automatically begins. (For details, refer to page 16.) Notes on tape programming • To check, cancel or correct program data, refer to page 13. • The maximum number of tracks that can be programmed is 40. If, however, the PAUSE mode is inserted, it is counted as one track. • This function can be used to program up to track number 20. If the disc has more than 20 tracks, tracks with track number 21 and higher cannot be programmed. TRACK PROGRAMMING FOR RECORDING s Display information during programming 1DISC REP RNDM SAVE BEST EDIT FILE 1 2 3 4 5 5DISCS S F PROG CD- TEXT SEARCH TITLE ARTIST TRACK 123 4 5 6 7 8 9 10 -- A- 1 11 12 13 14 15 16 17 18 19 20 1 2 4 1DISC REP RNDM SAVE BEST EDIT FILE 1 2 3 4 5 5DISCS S F PROG CD- TEXT SEARCH TITLE ARTIST TRACK 123 4 5 6 7 8 9 10 -4 - 8 : 2 8 11 12 13 14 15 16 17 18 19 20 3 1 Shows the side of the tape and the program number for the track to be programmed next. 2 Shows the selected disc and track number. 3 Shows the total remaining time on the side of the tape. 4 Programmed track numbers light up and programmable track numbers among the unprogrammed ones blink. * If "A-1" does not appear in the display after the PROG button is pressed, press the TEXT/TIME display modeselect button. * If, during programming, the TEXT/TIME display modeselect button is pressed, the program number display can be changed to display the total remaining time on the side of the tape. To return to the previous display, press the TEXT/TIME display mode-select button once again. English E-19
-
 1
1 -
2
-
3
-
4
-
5
-
6
-
7
-
8
-
9
-
10
-
11
-
12
-
13
-
14
-
15
-
16
-
17
-
 18
18 -
 19
19 -
 20
20 -
 21
21 -
 22
22 -
 23
23 -
 24
24 -
 25
25 -
 26
26 -
 27
27 -
 28
28
 |
 |