Yamaha CDC-775 Owner's Manual - Page 20
Cd Synchronized Recording
 |
View all Yamaha CDC-775 manuals
Add to My Manuals
Save this manual to your list of manuals |
Page 20 highlights
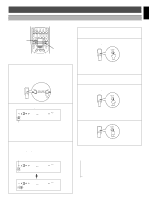
CD SYNCHRONIZED RECORDING Using a compatible YAMAHA tape deck, you can synchronize the tape deck to start recording automatically when a CD starts playing. With this function, you can record a CD on tape more easily and precisely. (Refer to the tape deck's operation manual to know whether it is compatible or not.) * This unit and the tape deck must be placed close to each other so that both of them can receive the signals from this unit's remote control transmitter at the same time. 3 4 1 SYNCHRO PEAK DIMMER TIME OPEN/ CLOSE REPEAT RANDOM TAPE CLEAR PROG 1 2 3 4 5 6 7 8 9 0 +10 FILE EDIT FILE MODE INDEX CAPS DISC SKIP/ CHARACTER DISC MODE TEXT MODE TEXT SRCH ENTER DISC SCAN SKIP/SEARCH OUTPUT LEVEL STOP PAUSE PLAY 4 5 1 Select a disc. DISC SKIP/ CHARACTER 2 Load a tape on the tape deck. * The peak level searching function of this unit is useful for adjusting recording level on the tape deck. (Refer to page 24.) 3 SYNCHRO 4 If desired, select the track to be recorded first. 6 or SKIP/SEARCH 5 PLAY This unit enters into the pause mode, and the tape deck enters into the REC/PAUSE mode. * In this mode, the time display on this unit blinks. Both CD play and tape deck recording begin. * CD play begins a little later than recording. 6 If you want to stop recording temporarily and restart recording from a desired track, follow steps 3-5 again. To cancel this function Press the STOP button. Notes q To finish or stop recording, press the "STOP" button on the tape deck. q Programmed sequence of tracks can also be recorded with this function, instead of recording an entire disc. (Refer to pages 14-15 for the programming procedure.) q This function can also be used together with the automatic tape-programming function. (Refer to pages 21-23.) 20
-
 1
1 -
2
-
3
-
4
-
5
-
6
-
7
-
8
-
9
-
10
-
11
-
12
-
13
-
14
-
 15
15 -
 16
16 -
 17
17 -
 18
18 -
 19
19 -
 20
20 -
 21
21 -
 22
22 -
 23
23 -
 24
24 -
 25
25 -
26
-
27
-
28
 |
 |
