Yamaha CVP-209 Owner's Manual - Page 85
Saving and Recalling Custom Panel Setups — Registration Memory
 |
View all Yamaha CVP-209 manuals
Add to My Manuals
Save this manual to your list of manuals |
Page 85 highlights
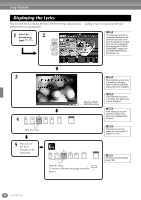
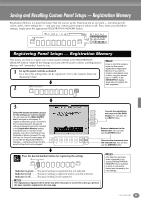
Saving and Recalling Custom Panel Setups - Registration Memory Registration Memory is a powerful feature that lets you set up the Clavinova just as you want - selecting specific voices, styles, effect settings etc. - and save your custom panel setup for future recall. Then, when you need those settings, simply press the appropriate REGISTRATION MEMORY button. POWER ON OFF MASTER VOLUME REGISTRATION MEMORY FREEZE 1 MIN MAX 2 STYLE ACMP AUTO FILL IN OTS LINK METRONOME START STOP FADE IN OUT MIC. SIGNAL VOCAL HARMONY OVER TALK EFFECT VH TYPE SELECT MIC. SETTING SONG EXTRA TRACKS STYLE TRACK 2 L TRACK 1 R REC TOP START STOP REW FF REPEAT TAP TEMPO GUIDE 3 BREAK INTRO TEMPO 4 RESET MAIN TAP TEMPO TRANSPOSE 5 RESET ENDING rit. SYNC.STOP SYNC.START START STOP MENU DEMO A HELP B FUNCTION C DIGITAL STUDIO D 6 SOUND CREATOR E DIGITAL RECORDING 7 MIXING CONSOLE BALANCE PART CHANNEL ON OFF PART 8 BACK NEXT MEMORY F VOICE PART ON OFF G LAYER H LEFT I J VOICE EFFECT REVERB DSP VARIATION HARMONY ECHO MONO VOICE PIANO & HARPSI. E. PIANO ORGAN & ACCORDION PERCUSSION BRASS WOODWIND STRINGS CHOIR & PAD GUITAR SYNTH. LEFT HOLD BASS XG ORGAN FLUTES USER ENTER MUSIC FINDER ONE TOCTH SETTING 1 2 3 4 DATA ENTRY PIANO FREEZE 1 2 3 4 5 6 7 8 MEMORY DIRECT ACCESS 1 2 3 4 5 6 7 8 EXIT Registering Panel Setups - Registration Memory This shows you how to register your custom panel settings to the REGISTRATION MEMORY buttons. Make all the settings you want with the panel controls, and Registration Memory will "remember" them for you. 1 Set up the panel controls as desired. For a list of the settings that can be registered, refer to the separate Data List (Parameter Chart). 2 REGISTRATION MEMORY FREEZE 1 2 3 4 5 6 7 8 MEMORY Keep in mind that songs or styles on disk cannot registered to Registration Memory. If you want to register a disk-based song or style, copy the relevant data to "USER" in the SONG/STYLE display (page 39) and register the data separately. 3 Select the desired parameter groups for the settings you want to register. You can also use the [DATA ENTRY] dial to navigate in this display. To register a parameter group, checkmark the corresponding box. Groups left without checkmarks will not be included in the Registration Memory setting. This allows you to maintain certain settings, even when switching among Registration Memory presets. You can also use the Freeze function (page 87) to override the Registration Memory changes - letting you prevent certain panel settings from being changed. 1 2 3 4 5 6 7 8 F Cancels the registration and returns to the MAIN G display. You can also use H the [EXIT] button. I J Enters a checkmark to the selected box. You can also use the [ENTER] button. Removes the checkmark from the selected box. You can also use the [ENTER] button. END Press the desired number button for registering the settings. REGISTRATION MEMORY FREEZE 1 2 3 4 5 6 7 8 MEMORY Indicator is green ..... The panel setting is registered, but not selected. Indicator is red......... The panel setting is registered and is currently selected. Indicator is off.......... The panel setting is not registered. The registrations registered here will be lost when the power is turned off, unless you perform the Save operation explained on the next page. Any data that was previously registered to the selected REGISTRATION MEMORY button (indicator is green or red) will be erased and replaced by the new settings. CVP-209/207 85
-
 1
1 -
2
-
3
-
4
-
5
-
6
-
7
-
8
-
9
-
10
-
11
-
12
-
13
-
14
-
15
-
16
-
17
-
18
-
19
-
20
-
21
-
22
-
23
-
24
-
25
-
26
-
27
-
28
-
29
-
30
-
31
-
32
-
33
-
34
-
35
-
36
-
37
-
38
-
39
-
40
-
41
-
42
-
43
-
44
-
45
-
46
-
47
-
48
-
49
-
50
-
51
-
52
-
53
-
54
-
55
-
56
-
57
-
58
-
59
-
60
-
61
-
62
-
63
-
64
-
65
-
66
-
67
-
68
-
69
-
70
-
71
-
72
-
73
-
74
-
75
-
76
-
77
-
78
-
79
-
 80
80 -
 81
81 -
 82
82 -
 83
83 -
 84
84 -
 85
85 -
 86
86 -
 87
87 -
 88
88 -
 89
89 -
 90
90 -
91
-
92
-
93
-
94
-
95
-
96
-
97
-
98
-
99
-
100
-
101
-
102
-
103
-
104
-
105
-
106
-
107
-
108
-
109
-
110
-
111
-
112
-
113
-
114
-
115
-
116
-
117
-
118
-
119
-
120
-
121
-
122
-
123
-
124
-
125
-
126
-
127
-
128
-
129
-
130
-
131
-
132
-
133
-
134
-
135
-
136
-
137
-
138
-
139
-
140
-
141
-
142
-
143
-
144
-
145
-
146
-
147
-
148
-
149
-
150
-
151
-
152
-
153
-
154
-
155
-
156
-
157
-
158
-
159
-
160
-
161
-
162
-
163
-
164
-
165
-
166
-
167
-
168
-
169
-
170
-
171
-
172
-
173
-
174
-
175
-
176
 |
 |
