Yamaha CVP-307 Owner's Manual - Page 185
Playing External Audio Devices with, the Built-in Speakers [AUX IN] Jacks, Showing the Instrument's
 |
View all Yamaha CVP-307 manuals
Add to My Manuals
Save this manual to your list of manuals |
Page 185 highlights
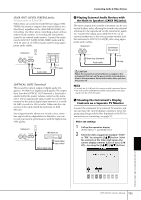
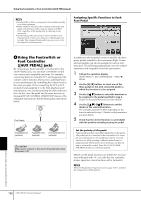
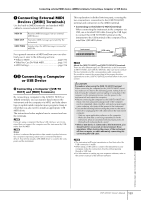
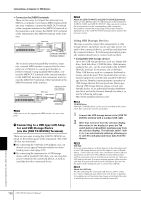
Connecting Audio & Video Devices [AUX OUT (LEVEL FIXED)] Jacks (RCA pin jacks of [L]and [R]) When these are connected (with RCA pin plug; LEVEL FIXED), the sound is output to the external device at a fixed level, regardless of the [MASTER VOLUME] control setting. Use these when controlling volume with an external audio system, or recording the instrument's sound to an external audio system. Connect the instrument's AUX OUT [L]/[R] (LEVEL FIXED) jacks and the AUX IN jacks of an external audio system using appropriate audio cables. Instrument OPTICAL OUT (LEVEL FIXED) L/L+R R L R Stereo system AUX OUT Pin plug Audio cable AUX IN Pin plug [OPTICAL OUT] Terminal This is used for optical output of digital audio (frequency: 44.1kHz) for highest sound quality. The output level from the [OPTICAL OUT] terminal is fixed and is unaffected by the master volume control on the instrument. Use an appropriate optical cable to connect this terminal to the optical digital input terminal of a minidisk (MD) recorder or CD recorder. (Make sure the connectors of the cable match the terminals on both devices.) Since digital transfer allows you record a clear, noisefree signal with no degradation or distortion, you can record your favorite performances with the highest possible quality. Instrument OPTICAL OUT (LEVEL FIXED) L/L+R R L R MD deck etc. AUX OUT Optical digital input terminal Optical digital cable 4 Playing External Audio Devices with the Built-in Speakers ([AUX IN] Jacks) The stereo outputs from another instrument can be connected to these jacks, allowing the sound of an external instrument to be reproduced via the instrument's speakers. Connect the output jacks (LINE OUT etc.) of an external synthesizer or the tone generator module and the instrument's AUX IN [L/L+R]/[R] jacks using appropriate audio cables. Instrument L/L+R R Synthesizer Tone generator AUX IN Phone plug (standard) Audio cable LINE OUT Pin plug CAUTION When the sound of an external device is output to the instrument, first turn on the power to the external device, then to the instrument. Reverse this order when you turn the power off. n • Use only the [L/L+R] jack for connection with a monaural device. • The instrument's [MASTER VOLUME] setting affects the input signal from the [AUX IN] jacks. 5 Showing the Instrument's Display Contents on a Separate TV Monitor Connect the instrument to an external TV monitor, and you can have the current display contents or lyrics (for group sing-alongs and the like) displayed on the TV. For instructions on connecting, see page 53. Video out settings 1 Call up the operation display. [FUNCTION] → [G] VIDEO OUT 2 Select the video equipment standard "NTSC" or "PAL" by using the [1π†] button. Select the contents of the Video Out signal-the current display contents (LCD) or lyrics (LYRICS)-by using the [3π†]/[4π†] buttons. Using Your Instrument with Other Devices 1 2 3 4 5 6 7 8 CVP-309/307 Owner's Manual 185
-
 1
1 -
2
-
3
-
4
-
5
-
6
-
7
-
8
-
9
-
10
-
11
-
12
-
13
-
14
-
15
-
16
-
17
-
18
-
19
-
20
-
21
-
22
-
23
-
24
-
25
-
26
-
27
-
28
-
29
-
30
-
31
-
32
-
33
-
34
-
35
-
36
-
37
-
38
-
39
-
40
-
41
-
42
-
43
-
44
-
45
-
46
-
47
-
48
-
49
-
50
-
51
-
52
-
53
-
54
-
55
-
56
-
57
-
58
-
59
-
60
-
61
-
62
-
63
-
64
-
65
-
66
-
67
-
68
-
69
-
70
-
71
-
72
-
73
-
74
-
75
-
76
-
77
-
78
-
79
-
80
-
81
-
82
-
83
-
84
-
85
-
86
-
87
-
88
-
89
-
90
-
91
-
92
-
93
-
94
-
95
-
96
-
97
-
98
-
99
-
100
-
101
-
102
-
103
-
104
-
105
-
106
-
107
-
108
-
109
-
110
-
111
-
112
-
113
-
114
-
115
-
116
-
117
-
118
-
119
-
120
-
121
-
122
-
123
-
124
-
125
-
126
-
127
-
128
-
129
-
130
-
131
-
132
-
133
-
134
-
135
-
136
-
137
-
138
-
139
-
140
-
141
-
142
-
143
-
144
-
145
-
146
-
147
-
148
-
149
-
150
-
151
-
152
-
153
-
154
-
155
-
156
-
157
-
158
-
159
-
160
-
161
-
162
-
163
-
164
-
165
-
166
-
167
-
168
-
169
-
170
-
171
-
172
-
173
-
174
-
175
-
176
-
177
-
178
-
179
-
 180
180 -
 181
181 -
 182
182 -
 183
183 -
 184
184 -
 185
185 -
 186
186 -
 187
187 -
 188
188 -
 189
189 -
 190
190 -
191
-
192
-
193
-
194
-
195
-
196
-
197
-
198
-
199
-
200
-
201
-
202
-
203
-
204
-
205
-
206
-
207
-
208
-
209
-
210
-
211
-
212
-
213
-
214
-
215
-
216
-
217
-
218
-
219
-
220
-
221
-
222
-
223
-
224
 |
 |
