Yamaha DM1000 Studio Manager Installation Guide - Page 19
Setting Up OMS, Turn on your Yamaha mixing console.
 |
View all Yamaha DM1000 manuals
Add to My Manuals
Save this manual to your list of manuals |
Page 19 highlights
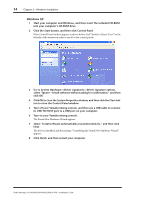
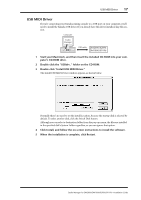
Setting Up OMS 19 Setting Up OMS The "OMS Setup for YAMAHA" folder on the included CD-ROM contains OMS studio setup files preconfigured for use with your Yamaha mixing console. 1 Turn off your Yamaha mixing console, and then use a USB cable to connect its USB TO HOST port to a USB port on your computer. If you are connecting to the SERIAL TO HOST port, use a serial cable to connect to the Printer or Modem port on your computer. 2 Turn on your Yamaha mixing console. 3 Start your Macintosh, and then insert the included CD-ROM into your computer's CD-ROM drive. 4 Open the "OMS_" folder on the CD-ROM, and then open the "OMS Setup for YAMAHA" folder. The "DM2000/02R96" folder contains the following OMS studio setup files: • DM2000-USB • DM2000-Modem • DM2000-Printer • 02R96-USB • 02R96-Modem • 02R96-Printer The "DM1000/01V96" folder contains the following OMS studio setup files: • DM1000-USB • 01V96-USB 5 Copy the appropriate file to your computer's hard disk, and then double-click it. Note: If the AppleTalk dialog box appears, click the Turn It Off button, and then click OK on the subsequent dialog box. OMS Setup starts and the Studio Setup file window appears. 6 Choose Make Current from the File menu, and then save the setup. Note: If you are using Studio Manager for DM2000/02R96 and the Modem or Printer port, go to OMS Setup Preferences and turn off "Use Apple SerialDMA driver when available." After completing the above setup, your Yamaha mixing console will be the only MIDI device in the current OMS studio setup. In order to use other MIDI devices, or to add an additional Yamaha mixing console, you must create a new studio setup. See the "OMS_2.3_Mac.pdf" for more information. Studio Manager for DM2000/DM1000/02R96/01V96-Installation Guide
-
 1
1 -
2
-
3
-
4
-
5
-
6
-
7
-
8
-
9
-
10
-
11
-
12
-
13
-
 14
14 -
 15
15 -
 16
16 -
 17
17 -
 18
18 -
 19
19 -
 20
20 -
 21
21 -
 22
22 -
 23
23 -
 24
24 -
25
-
26
-
27
-
28
 |
 |
