Yamaha DRX-1 Owner's Manual - Page 10
Step 5: Connections - Front of, your DVD Recorder optional, Step 6: Power supply, Switching
 |
View all Yamaha DRX-1 manuals
Add to My Manuals
Save this manual to your list of manuals |
Page 10 highlights
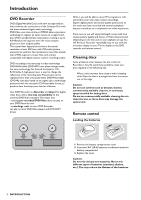
Step 5: Connections - Front of your DVD Recorder (optional) Video camera connection ● If you have a DV or Digital 8 video camera, connect the i-link DV input jack on the Recorder (1) to the corresponding output jack on the video camera using the i-link cable of your video camera. This connection enables digital recording from the following devices: - DV or Digital 8 video camera - Digital video deck - Personal computer with DV output - DVD recorder with DV output ● If you have a Hi-8 or S-VHS(C) video camera, connect the DVD Recorder's S-VIDEO IN jack to the corresponding OUT jack on the video camera. Use the S-Video cable supplied (2).Then connect the AUDIO Left (white) and Right (red) IN jacks of the DVD Recorder to the corresponding OUT jacks on the video camera using the AUDIO cable supplied (4). ● Otherwise, connect the VIDEO IN jack on the DVD Recorder (yellow) to the corresponding OUT jack on the video camera. Use the video cable supplied (3).Then connect the AUDIO Left (white) and Right (red) IN jacks of the DVD Recorder to the corresponding OUT jacks on the video camera using the AUDIO cable supplied (4). ● If your video camera has mono sound, use only the left audio connector. In this case the sound will be recorded on both audio channels. Notes You will need only one video connection and one audio connection: only the i-link DV connection carries both video and audio.You may not use all the jacks on the DVD Recorder. Step 6: Power supply ● Make sure all necessary connections are made before connecting the DVD Recorder to the power supply. ● Plug the supplied power cable into the Power jack on the back of the Recorder. ● Connect the power cord to an AC outlet. Note: Make sure the local power voltage matches the required 110V. When the Recorder is in the 'standby/power off ' position, it is still consuming some power. If you wish to disconnect your DVD Recorder completely from power, remove the power cord from the AC Outlet. When the DVD Recorder is disconnected from the power, TV channels and timer data usually will be stored one year. Switching on ● Switch on the TV and the amplifier, then select the TV's Video In channel or the channel you have chosen for video playback ● Press STANDBY/ON to turn on the Recorder. ➤ The Recorder display lights. If you have not yet installed your DVD Recorder, it will enter 'Initial setup.' You will have to set your personal preferences. 12 34 Video camera 6 INSTALLATION
-
 1
1 -
2
-
3
-
4
-
 5
5 -
 6
6 -
 7
7 -
 8
8 -
 9
9 -
 10
10 -
 11
11 -
 12
12 -
 13
13 -
 14
14 -
 15
15 -
16
-
17
-
18
-
19
-
20
-
21
-
22
-
23
-
24
-
25
-
26
-
27
-
28
-
29
-
30
-
31
-
32
-
33
-
34
-
35
-
36
-
37
-
38
-
39
-
40
-
41
-
42
-
43
-
44
-
45
-
46
-
47
-
48
-
49
-
50
-
51
-
52
-
53
-
54
-
55
-
56
 |
 |
