Yamaha DVD-C920 Owners Manual - Page 15
BASIC OPERATION, Before starting play, Playing a disc
 |
View all Yamaha DVD-C920 manuals
Add to My Manuals
Save this manual to your list of manuals |
Page 15 highlights
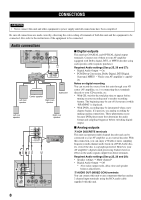
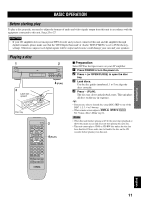
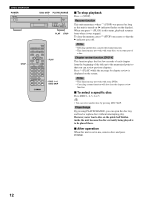
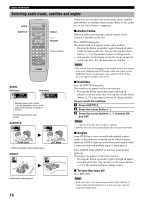
INTRODUCTIOIN PREPARATIONS PLAYBACK BASIC OPERATION Before starting play To play a disc properly, you need to adjust the formats of audio and video signals output from this unit in accordance with the equipment connected to this unit. See p.25 to 27. CAUTION • If your AV amplifier does not incorporate DTS decoder and you have connected this unit and the amplifier through digital terminals, please make sure that the 'DTS Digital Surround' at 'Audio' SETUP MENU is set to PCM (factorysetting). Otherwise, unprocessed digital signals will be output and its noise could damage your ears and your speakers. Playing a disc 1 POWER 3 Label side upward 2 PROGRESSIVE VIDEO OFF GROUP VIDEO OFF PROGRESSIVE ON DISC SKIP PLAYXCHANGE 4 (PLAY) Disc tray OPEN/CLOSE PLAY MODE REPEAT A-B MARKER SUBTITLE AUDIO ANGLE TOP MENU MENU ON SCREEN ENTER RETURN STOP PLAY PAUSE SKIP SLOW/SEARCH 1 2 3 4 5 6 7 8 CANCEL 9 0 10 VIDEO OFF GROUP PAGE PROGRESSIVE DISC1 SET UP DISC4 DISC2 DISC3 DISC SKIP DISC5 2 4 (PLAY) I Preparation Select DVD as the input source on your AV amplifier. 1 Press POWER to turn the power on. 2 Press v (or OPEN/CLOSE) to open the disc tray. 3 Load discs. Use the disc guides (numbered, 1 to 5) to align the discs correctly. 4 Press w (PLAY). The disc tray closes and playback starts. This unit plays all discs on the tray in sequence. y • If necessary, select a desired disc using DISC SKIP or one of the DISC 1, 2, 3, 4 or 5 buttons. • When a menu screen appears DVD-A DVD-V VCD : See 'Using a Disc's Menu' in p.14. Notes • When this unit finishes playing a DVD, this unit stops playback or shows the menu screen and does not start playing the next disc. • This unit cannot play a CD-R or CD-RW disc unless the disc has been finalized. Please make sure to finalize the disc on the CD recorder before playing it on this unit. PLAYBACK SETUP MENU APPENDIX English 11
-
 1
1 -
2
-
3
-
4
-
5
-
6
-
7
-
8
-
9
-
 10
10 -
 11
11 -
 12
12 -
 13
13 -
 14
14 -
 15
15 -
 16
16 -
 17
17 -
 18
18 -
 19
19 -
 20
20 -
21
-
22
-
23
-
24
-
25
-
26
-
27
-
28
-
29
-
30
-
31
-
32
-
33
-
34
-
35
-
36
 |
 |
