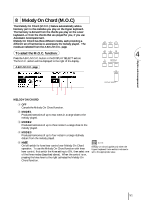
Yamaha EL-57 Owner's Manual - Page 60
DATA Data Controls, INS. Insert, DEL. Delete, CLEAR
 |
View all Yamaha EL-57 manuals
Add to My Manuals
Save this manual to your list of manuals |
Page 60 highlights
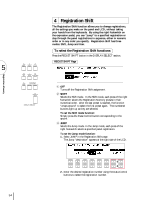
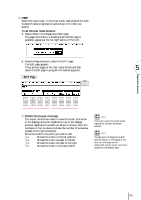
Registration Memory 5 56 2 DATA (Data Controls) The data controls are used to enter and delete registration numbers in the registration row. Move the cursor to the desired position and edit the registration data. 2-1 SET For initially entering a registration number to a blank space in the registration row, or for replacing a number at the current cursor position. To enter a number, press the desired Registration Memory button (the selected button will light), then press the Data Control button corresponding to SET. After using SET to enter registrations, the cursor can be moved among the numbers. 2-2 INS. (Insert) For inserting a registration number just before the current cursor position. The new registration number is inserted at the cursor position and all other numbers to the right of the cursor are moved to accommodate the new numbers. To perform the operation, first move the cursor to a numbered position. Then press the desired Registration Memory button (the selected button will light), and press the Data Control button corresponding to INS. 2-3 DEL. (Delete) For deleting a registration number at the current cursor position. To delete the unnecessary number, move the cursor to a numbered position and press the Data Control button corresponding to DEL. 2-4 CLEAR For erasing all current user Registration Shift Settings. After selecting CLEAR, the following display appears: OK Cancel Select OK to clear all data. The message "Completed!!" momentarily appears on the LCD and returns to the previous display. Select Cancel to abort the operation.
-
 1
1 -
2
-
3
-
4
-
5
-
6
-
7
-
8
-
9
-
10
-
11
-
12
-
13
-
14
-
15
-
16
-
17
-
18
-
19
-
20
-
21
-
22
-
23
-
24
-
25
-
26
-
27
-
28
-
29
-
30
-
31
-
32
-
33
-
34
-
35
-
36
-
37
-
38
-
39
-
40
-
41
-
42
-
43
-
44
-
45
-
46
-
47
-
48
-
49
-
50
-
51
-
52
-
53
-
54
-
 55
55 -
 56
56 -
 57
57 -
 58
58 -
 59
59 -
 60
60 -
 61
61 -
 62
62 -
 63
63 -
 64
64 -
 65
65 -
66
-
67
-
68
-
69
-
70
-
71
-
72
-
73
-
74
-
75
-
76
-
77
-
78
-
79
-
80
-
81
-
82
-
83
-
84
-
85
-
86
-
87
-
88
-
89
-
90
-
91
-
92
-
93
-
94
-
95
-
96
-
97
-
98
-
99
-
100
-
101
-
102
-
103
-
104
-
105
-
106
-
107
-
108
-
109
-
110
-
111
-
112
-
113
-
114
-
115
-
116
-
117
-
118
-
119
-
120
-
121
-
122
-
123
-
124
-
125
-
126
-
127
-
128
-
129
-
130
-
131
-
132
-
133
-
134
-
135
-
136
-
137
-
138
-
139
-
140
-
141
-
142
-
143
 |
 |
