Yamaha EMX5000-20 Owner's Manual - Page 34
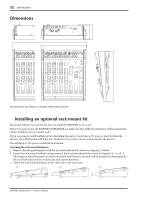
Dimensions, Installing an optional rack mount kit, Attaching the rack mount hardware.
 |
View all Yamaha EMX5000-20 manuals
Add to My Manuals
Save this manual to your list of manuals |
Page 34 highlights
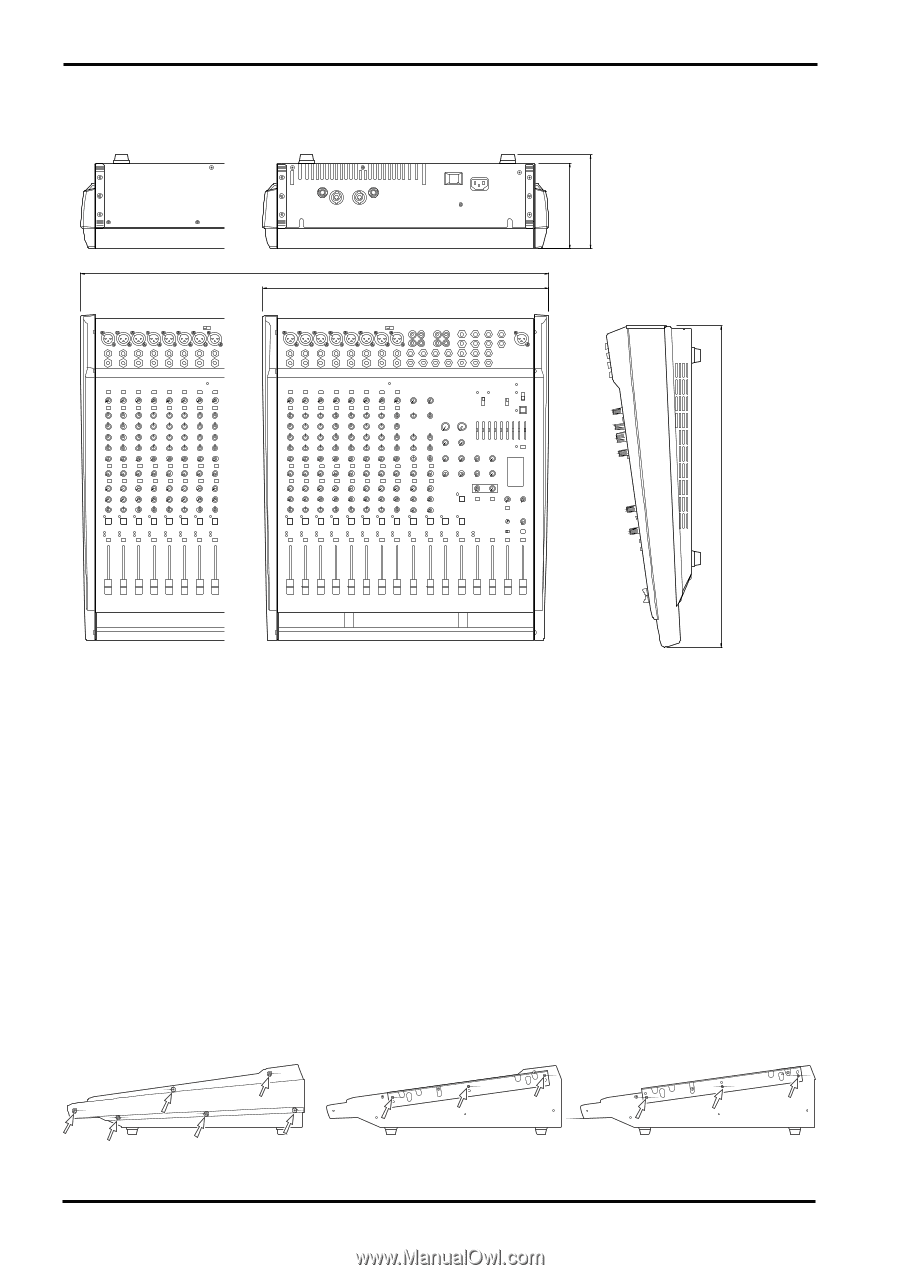
32 Specifications Dimensions 682 (EMX5000-20) 478 (EMX5000-12) 143 158 538 Specifications are subject to change without prior notice. Unit: mm s Installing an optional rack mount kit By using the RK124 rack mount kit, you can install the EMX5000-12 in a rack. Before you rack-mount the EMX5000-20/EMX5000-12, make sure that sufficient ventilation will be maintained. (Never install the unit in a sealed rack.) If you are going to install multiple devices including the unit in a rack, keep a 1U space or more between the devices. Use a blank panel with holes for ventilation if you wish to insert a panel between the devices. You will need a 13U space to install the rack mount. Attaching the rack mount hardware. 1. Remove the side panel together with the six screws indicated by arrows in diagram 1 below. 2. Fasten the rack mount hardware using screws at the locations indicated by arrows in diagram 2-1 or 2-2. The height at which the panel (on which the knobs and faders are located) will be mounted is determined by the set of holes that you use to fasten the rack mount hardware. 3. Attach the rack mount hardware to the other side in the same way. 1 2-1 2-2 EMX5000-20/EMX5000-12-Owner's Manual
-
 1
1 -
2
-
3
-
4
-
5
-
6
-
7
-
8
-
9
-
10
-
11
-
12
-
13
-
14
-
15
-
16
-
17
-
18
-
19
-
20
-
21
-
22
-
23
-
24
-
25
-
26
-
27
-
28
-
 29
29 -
 30
30 -
 31
31 -
 32
32 -
 33
33 -
 34
34 -
 35
35 -
 36
36 -
 37
37 -
 38
38
 |
 |