Yamaha GX-700 Owner's Manual - Page 38
Manual EDIT recording, Display information during programming
 |
View all Yamaha GX-700 manuals
Add to My Manuals
Save this manual to your list of manuals |
Page 38 highlights
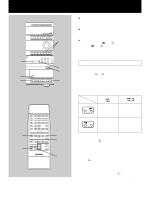
Recording DISC 1 DISC 2 DISC 3 DISC CHANGE OPEN / CLOSE PRESET/ TUNING/ BAND A/B/C/D/E VOLUME DOWN UP PROGRAM B.BOOST MUSIC INPUT INPUT RANDOM REPEAT TIME MODE HOUR MIN DOLBY NR REC/PAUSE AUTO/MANUAL MEMORY DISPLAY TIMER TIME ADJ STANDBY/ON 1 TIME 5 TIME 3 4 1 2 3 1 2 3 6 7 8 6 7 8 A B C TIME PROG R. TIME MODE REPEAT RANDOM 4 5 4 5 PRESET 9 0 D E EDIT +I0 TUNER DISC SKIP TUNER CD REC/PAUSE TAPE DIRECTION CENTER/ REAR/DELAY TEST PROGRAM BASS BOOST MUSIC LEVEL POWER SLEEP /I INPUT VOLUME 9 7 1 Display information during programming Next play order Selected disc TRACK K AM C HALL YMERSION VCD PBC NR TIMER SLEEP NOR TEST PHANTOM TUNER CD MD TAPE RANDOM 123456 7 8 9 10 11 12 13 14 15 OVER 15 EDIT S F REP A B PROG VOLUME Side of the tape Selected track number Total remaining time on this side of the tape TRACK REM M NR CD 123456 7 8 9 10 11 12 13 14 15 OVER 15 A PROG VOLUME Programmed track numbers light up and only programmable track numbers among unprogrammed ones flash. E-28 Ⅵ Manual EDIT recording You can program tracks manually while watching the remaining time on both sides of the tape. 1 Press INPUT or once or more until "CD" (1, 5) appears on the display, and load a disc (or discs) on the disc tray. 2 Follow steps 3-5 on page 26. 3 Press PROG. * "PROG" and "P-01" will light up on the display, and all track numbers on the selected disc will begin flashing. 4 If necessary, select the desired disc by pressing DISC SKIP. 5 Select the desired track number by pressing the numeric buttons. 6 Repeat steps 4 and 5 to program more selections for side A of the tape. You can select the same track again. * Pressing TIME displays the total remaining time on side A of the tape for about 1 second, and then it is replaced by the display of the next play order. * If "TM OVER" appears on the display, the track number just selected cannot be programmed because there is not enough time remaining on side A of the tape. However, at this time, if any other track number is flashing continuously on the display, you can program it instead of the unprogrammable one. 7 When the programming for side A is finished, press R. TIME. * "Side-B" appears on the display. You can begin programming for side B. * After following this step, you can check the programmed contents for side A and side B alternately by pressing R. TIME at any time before you press EDIT in step 9. * The tape side indicator (9) shows the programming side currently selected. 8 Repeat steps 4 and 5 to program selections for side B of the tape. You can select the same track again. 9 Press EDIT. ("EDIT" (8) lights up on the display.) The recording starts. Notes on recording with the EDIT function ● To check, cancel or correct program data, refer to page 14. ● The maximum number of tracks that can be programmed is 20. ● The track number 16 or higher cannot be programmed by this function.
-
 1
1 -
2
-
3
-
4
-
5
-
6
-
7
-
8
-
9
-
10
-
11
-
12
-
13
-
14
-
15
-
16
-
17
-
18
-
19
-
20
-
21
-
22
-
23
-
24
-
25
-
26
-
27
-
28
-
29
-
30
-
31
-
32
-
 33
33 -
 34
34 -
 35
35 -
 36
36 -
 37
37 -
 38
38 -
 39
39 -
 40
40 -
 41
41 -
 42
42 -
 43
43 -
44
-
45
-
46
-
47
-
48
-
49
-
50
 |
 |
