Yamaha HTR-5440RDS Owner's Manual - Page 36
RECORDING A SOURCE, Select the source you want to record.
 |
View all Yamaha HTR-5440RDS manuals
Add to My Manuals
Save this manual to your list of manuals |
Page 36 highlights
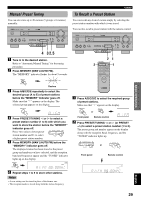
RECORDING A SOURCE Recording adjustments and other operations are performed from the recording component. Refer to the instructions for these components. 1,4 STANDBY /ON D I G I TA L SURROUND BASS TREBLE BALANCE -+ -+ L R SPEAKERS A B ON OFF PROGRAM PHONES D I G I TA L RDS MODE/FREQ EON PTY SEEK MODE START VOLUME EFFECT PRESET/TUNING VIDEO L AUDIO R A/B/C/D/E PRESET /TUNING FM/AM EDIT MEMORY TUNING MODE MAN'L/AUTO FM AUTO/MAN'L MONO INPUT MODE INPUT 6CH INPUT SILENT VIDEO AUX 2 2 Notes • Do a test recording before you start an actual recording. • When this unit is set in the standby mode, you cannot record between other components connected to this unit. • The DSP program and the setting of VOLUME, BASS, TREBLE and BALANCE have no effect on the material being recorded. • A source connected to the 6CH INPUT jacks of this unit cannot be recorded. • A given input source is not output on the same REC OUT channel. (For example, the signal input from VCR 1 IN is not output on VCR 1 OUT.) • Check the copyright laws in your country to record from records, CDs, radio, etc. Recording of copyrighted material may infringe copyright laws. If you play back a video source that uses scrambled or encoded signals to prevent it from being dubbed, the picture itself may be disturbed due to those signals. 4 1 Set the volume at the VOLUME minimum level. Front panel 2 Select the source you want to record. INPUT or Front panel Remote control 3 Begin recording by the recording component connected to this unit. 4 Play the source and then turn up the volume to confirm the input source. VOLUME or Front panel Remote control 34
-
 1
1 -
2
-
3
-
4
-
5
-
6
-
7
-
8
-
9
-
10
-
11
-
12
-
13
-
14
-
15
-
16
-
17
-
18
-
19
-
20
-
21
-
22
-
23
-
24
-
25
-
26
-
27
-
28
-
29
-
30
-
 31
31 -
 32
32 -
 33
33 -
 34
34 -
 35
35 -
 36
36 -
 37
37 -
 38
38 -
 39
39 -
 40
40 -
 41
41 -
42
-
43
-
44
-
45
-
46
-
47
-
48
-
49
-
50
-
51
-
52
-
53
-
54
-
55
-
56
-
57
 |
 |
