Yamaha HTR 6080 MCXSP10 Manual - Page 14
What do you want to do with this unit?, Customizing the SCENE templates, Using various input sources - setup
 |
View all Yamaha HTR 6080 manuals
Add to My Manuals
Save this manual to your list of manuals |
Page 14 highlights
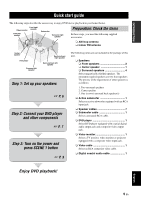
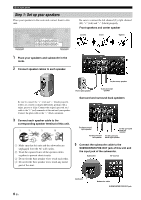
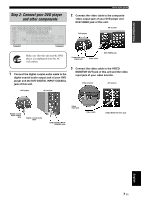
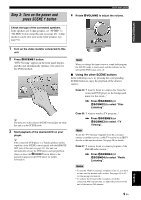
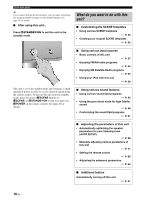
Quick start guide y If you cannot find the desired situation, you can select and change the assigned SCENE template for the SCENE buttons. See page 33 for details. ■ After using this unit... Press ASTANDBY/ON to set this unit to the standby mode. What do you want to do with this unit? ■ Customizing the SCENE templates • Using various SCENE templates ☞ P. 33 • Creating your original SCENE templates ☞ P. 36 This unit is set to the standby mode and consumes a small amount of power in order to receive infrared signals from the remote control. To turn on this unit from the standby mode, press the desired ESCENE buttons (or FSCENE) or ASTANDBY/ON on the front panel (or HPOWER on the remote control). See page 25 for details. ■ Using various input sources • Basic controls of this unit ☞ P. 37 • Enjoying FM/AM radio programs ☞ P. 50 • Enjoying XM Satellite Radio programs ☞ P. 53 • Using your iPod with this unit ☞ P. 58 ■ Using various sound features • Using various sound field programs ☞ P. 42 • Using the pure direct mode for high fidelity sound ☞ P. 48 • Customizing the sound field programs ☞ P. 61 ■ Adjusting the parameters of this unit • Automatically optimizing the speaker parameters for your listening room (AUTO SETUP) ☞ P. 28 • Manually adjusting various parameters of this unit ☞ P. 71 • Setting the remote control ☞ P. 85 • Adjusting the advanced parameters ☞ P. 90 ■ Additional feature Automatically turning off this unit ☞ P. 41 10 En
-
 1
1 -
2
-
3
-
4
-
5
-
6
-
7
-
8
-
 9
9 -
 10
10 -
 11
11 -
 12
12 -
 13
13 -
 14
14 -
 15
15 -
 16
16 -
 17
17 -
 18
18 -
 19
19 -
20
-
21
-
22
-
23
-
24
-
25
-
26
-
27
-
28
-
29
-
30
-
31
-
32
-
33
-
34
-
35
-
36
-
37
-
38
-
39
-
40
-
41
-
42
-
43
-
44
-
45
-
46
-
47
-
48
-
49
-
50
-
51
-
52
-
53
-
54
-
55
-
56
-
57
-
58
-
59
-
60
-
61
-
62
-
63
-
64
-
65
-
66
-
67
-
68
-
69
-
70
-
71
-
72
-
73
-
74
-
75
-
76
-
77
-
78
-
79
-
80
-
81
-
82
-
83
-
84
-
85
-
86
-
87
-
88
-
89
-
90
-
91
-
92
-
93
-
94
-
95
-
96
-
97
-
98
-
99
-
100
-
101
-
102
-
103
-
104
-
105
-
106
-
107
-
108
-
109
-
110
-
111
-
112
-
113
-
114
-
115
-
116
-
117
-
118
-
119
-
120
-
121
-
122
-
123
-
124
-
125
 |
 |
