Yamaha MDX-E300 Owner's Manual - Page 7
GETTING STARTED, Remote control
 |
View all Yamaha MDX-E300 manuals
Add to My Manuals
Save this manual to your list of manuals |
Page 7 highlights
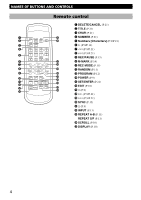
English GETTING STARTED Remote control Battery installation 2 1 Remote control operation range STANDBY/ON NATURAL SOUND MINIDISC RECORDER MDX-E300 INPUT REC/PAUSE REC LEVEL ANALOG - DIGITAL + MIN MAX 3 Remote control sensor 1 Remove the battery compartment cover. 2 Insert batteries into the battery compartment. 3 Replace the battery compartment cover. Battery replacement If you find that the remote control must be used closer to the main unit than usual, the batteries are weak. Replace batteries with new ones. Notes • Use only AA, R6, UM-3 batteries for replacement. • Be sure the polarities are correct. (See the illustration inside the battery compartment.) • Remove the batteries if the remote control will not be used for an extended period of time. • If batteries leak, dispose of them immediately. Avoid touching the leaked material or letting it come in contact with clothing, etc. Clean the battery compartment thoroughly before installing new batteries. Within approximately 6 m (20 feet) 30° 30° Notes • There should be no large obstacles between the remote control and the main unit. • If the remote control sensor is directly illuminated by strong lighting (especially an inverter type of fluorescent lamp, etc.), it might cause the remote control not to work correctly. In this case, reposition the main unit to avoid direct lighting. Removing the protection sheet The remote control is shipped with a protection sheet to prevent the surface from being scratched during transportation. When removing the sheet, first put adhesive tape on an edge of the remote control so that the tape sticks to the sheet. Then peel the sheet off with the tape. EDIT EDIT L K ENTESRET L J 4 X K H I V W 8 +100 G 3 U NUMCBAEDNCERELLETE J 4 X H I V W 8 NUMCBAEDNCERELLETE ENTESRET T Q R S 7 +S1P0ACE 2 EF TITLE +100 G 3 U T D CHAR Q R S 7 +S1P0ACE 2 EF TITLE D CHAR P 6 C B P 6 C M N 5O YZ 9 / 0 A 1 B M N 5O YZ 9 / 0 A 1 Note • Do not scratch the remote control surface when peeling the sheet off. 5
-
 1
1 -
 2
2 -
 3
3 -
 4
4 -
 5
5 -
 6
6 -
 7
7 -
 8
8 -
 9
9 -
 10
10 -
 11
11 -
 12
12 -
13
-
14
-
15
-
16
-
17
-
18
-
19
-
20
-
21
-
22
-
23
-
24
-
25
-
26
-
27
-
28
 |
 |
