Yamaha MG206C-USB Owner's Manual - Page 9
Adjusting Level and Tone, MONITOR/PHONES control. - tracks at once
 |
View all Yamaha MG206C-USB manuals
Add to My Manuals
Save this manual to your list of manuals |
Page 9 highlights
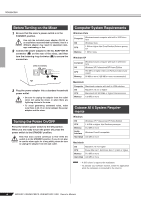
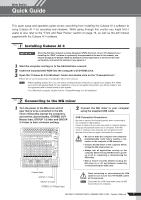
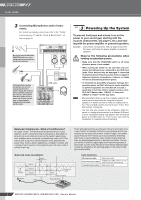
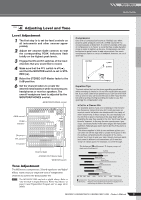
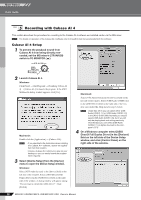
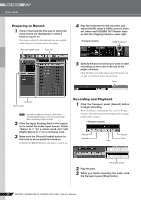
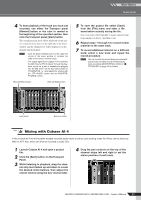
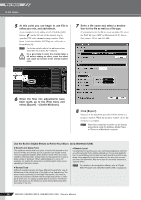
Mixer Basics Quick Guide 4 Step Adjusting Level and Tone Level Adjustment 1 The first step is to set the level controls on all instruments and other sources appropriately. 2 Adjust the channel GAIN controls so that the corresponding PEAK indicators flash briefly on the highest peak levels. 3 Engage the ON and ST switches of the input channels that you would like to record. 4 Make sure that the PFL switch is off ( ), and that the MONITOR switch is set to STEREO ( ). 5 Raise the STEREO OUT Master fader to the 0 dB position. 6 Set the channel faders to create the desired initial balance while monitoring via headphones or monitor speakers. The overall headphone level is adjusted by the MONITOR/PHONES control. MONITOR/PHONES control GAIN control PEAK indicator ON switch PFL switch ST switch Channel fader STEREO OUT Master fader MONITOR switch Tone Adjustment The MG mixer's compressors, 3-band equalizers and digital effects make it easy to shape the tone of independent channels to achieve the best possible mix. NOTE The MG166CX-USB has built-in digital effects. Refer to "Use the Built-in Digital Effects to Refine Your Mixes" on page 14 and "Digital Effect Program List" on page 23 for details. Compression One form of compression known as "limiting" can, when properly used, produce a smooth, unified sound with no excessive peaks or distortion. A common example of the use of compression is to "tame" a vocal that has a wide dynamic range in order to tighten up the mix. Compression can also be applied to guitar tracks to add extra sustain. Too much compression can be a cause of feedback, however, so use it sparingly. OUTPUT (Min) (Max) INPUT Equalizer Tips The best advice that can be given regarding equalization while recording is simply to use as little equalization as possible. If you want a little more presence you can turn the HIGH end up a bit. Or you can boost the bass a little if you feel the low end is lacking. During recording it's better to use EQ sparingly for compensation only. ● Cut for a Cleaner Mix For example: pianos have a lot of energy in the mid and low frequency ranges that you don't really perceive as musical sound, but which can interfere with the clarity of other instruments in these ranges. You can basically turn the low EQ on piano channels all the way down without changing the way they sound in the mix. You'll hear the difference, however, in the way the mix sounds more "spacious," and instruments in the lower ranges will have better definition. Naturally you won't want to do this if the piano is playing solo. The reverse applies to kick drums and bass guitars: you can often roll off the high end to create more space in the mix without compromising the character of the instruments. You'll have to use your ears, though, because each instrument is different and sometimes you'll want the "snap" of a bass guitar, for example, to come through. The fundamental and harmonic frequency ranges of some musical instruments. Cymbal Piano Bass Drum Snare Drum Bass Guitar Trombone Trumpet 20 50 100 200 500 1 k 2 k 5 k 10 k 20 k (Hz) Fundamental: The frequency that determines the basic musical pitch. Harmonics: Multiples of the fundamental frequency that play a role in determining the timbre of the instrument. MG206C-USB/MG166CX-USB/MG166C-USB Owner's Manual 9
-
 1
1 -
2
-
3
-
 4
4 -
 5
5 -
 6
6 -
 7
7 -
 8
8 -
 9
9 -
 10
10 -
 11
11 -
 12
12 -
 13
13 -
 14
14 -
15
-
16
-
17
-
18
-
19
-
20
-
21
-
22
-
23
-
24
-
25
-
26
-
27
-
28
-
29
-
30
-
31
-
32
-
33
-
34
-
35
-
36
-
37
 |
 |
